Mike's
Woodworking Projects
Villa Park, CA
I'm amazed that people have found this web site - I'm always surprised when I receive an e-mail from someone who wants to ask a question about one of my projects. If you found this web site, I'd really appreciate if you would send me an e-mail letting me know you found it and how you found it - from a Google search for something, or from a woodworking forum site, or... Just send me a note at mike@mikes-woodwork.com. I promise I won't use your e-mail address or send you any e-mail, unless you ask me a question. And if you'd like to tell me where in the world you're located, I'd be interested in that, also. Thanks!
If you would like to visit my non-woodworking (engineering) web site, you can find it here. I've gotten involved in beekeeping and you can see my beekeeping web site here. While this has nothing to do with woodworking, my wife's web site is here.
Visit my "Tutorials" page. I have tutorials on a variety of subjects.
I now have a "Project Gallery" page which shows some of the projects I've done, but I don't seem to keep it up well.
++++++++++++++++++++++++++++++++++++++++++++++++++++++++++++++++
3/7/2026 Here's a "simple" little project that has more complexities than you might expect - a salt and a pepper shaker. I had thought of doing this a long time ago but realized that I'd never be able to drill the holes for the "S" and "P" accurately enough by hand. Now that I have a CNC I realized that I could use it to drill the holes.
Here's a picture of three salt and pepper shakers that I made. The two on the left are ebony, the middle two are cocobolo and the two on the right are walnut (I think). I finished them with Target Coatings EMTECH EM-6000.
I did a tutorial on how to build the shakers and you can see it here.

2/3/2026 I was contacted by a woman who wanted a cremation box, but with a Star of David on the lid. Now, this is unusual because orthodox Judaism prohibits cremation - but the more liberal sects of Judaism allow it. I used my CNC machine to cut the Star of David and inlaid blue veneer into the cutout. Doing the inlay is tedious. The wood is some I got from an estate sale and I don't know what it is, It's dense and heavy. The center of the top is olive wood, bordered by ebony. It's 9.5 inches by 6.5 inches by 4 inches.
Anyway, here's the result. I removed the background in the picture.

12/15/2025 Quite a while back, I was contacted by a woman who wanted some boxes for cremation ashes. Since then I had several people ask for similar boxes. My wife calls them "Eternity Boxes" and I think that's a good name. Here are three. The one in the center is made from bloodwood. The top is bloodwood, olive wood, and ebony. The sides are bloodwood veneer. The other boxes are made from "wonder wood". I have no idea what wood it is. I did a tutorial on how to make them, which you can see here.

Here's a view into the bloodwood box, and you can see a part of the top on the left side. They're not too hard to make, but there are a lot of steps and that takes time.

A mortuary employee told me that 200 cubic inches was adequate for cremation remains. The outside dimensions of these boxes are 9.5 inches wide, 6.5 inches to the back, and 4 inches tall. The interior is a bit more than 200 cubic inches.
12/4/2025 Here's another sign I made for a friend. I was playing with texturing the background. There's a lot you can with the machine and I'm just beginning with it. I had to display this upside down because of the lighting. When I displayed it right side up, it looked like the background was raised.

11/30/2025 I've done a few projects on the CNC machine and am starting to feel a bit more comfortable with the VCarve software. Here's a sign I made for my niece.

I also programmed the CNC to drill the dimples for the Wahoo game. I did a tutorial on how to do that game by hand, and it's definitely easier with the CNC.
Since the last picture, I've gotten a touch plate and a dust boot. I still have some work to do on the dust collection but it's got to be better than no dust collection.
11/21/2025 I've made some progress on setting up the CNC machine. I bought a DeWalt 618 router (which comes with a 1/2 and a 1/4 inch collet), a 1/8 inch collet, a selection of router bits (end mills), clamps, double stick tape, a spoilboard, a bit for flattening the spoilboard, and a few other things I can't think of right now. I'm waiting for a touch plate and a dust boot that I ordered on eBay (both advertised as used).
I also had to update the firmware in the controller and pendant since the firmware that was in it dated back to 2016. That was a challenge but the technicians at Next Wave helped me get it done.
I had trouble getting the router all the way down into the holder - I hope I got it deep enough. It was very tight trying to get the router into the holder.
I have to do a trial job in VCarve now and see how it works - and if I understand what to do. I expect I'll do the trial job this weekend, unless I hit some problems.

11/14/2025 I recently got a CNC machine - a Next Wave Shark HD4.0. It's an older machine, the previous owner bought it in 2019, but it's in very good shape. It comes with VCarve Desktop, which I updated to the latest version, 12.5. I'm trying to learn VCarve now. It's a steep learning curve. The design part is not too difficult but the tool path creation is challenging.
Finding space in my shop was a challenge but I think I have it well placed now. I built some shelves in the table, and added a drawer for storage of the bits and collets.
Note there's no router in it yet. I ordered a DeWalt 618 which comes with a 1/2 inch and a 1/4 inch collet. I also ordered a 1/8 inch collet from a third party supplier. Also ordered some CNC oriented router bits. Probably be a week or more before I can get it into operation.

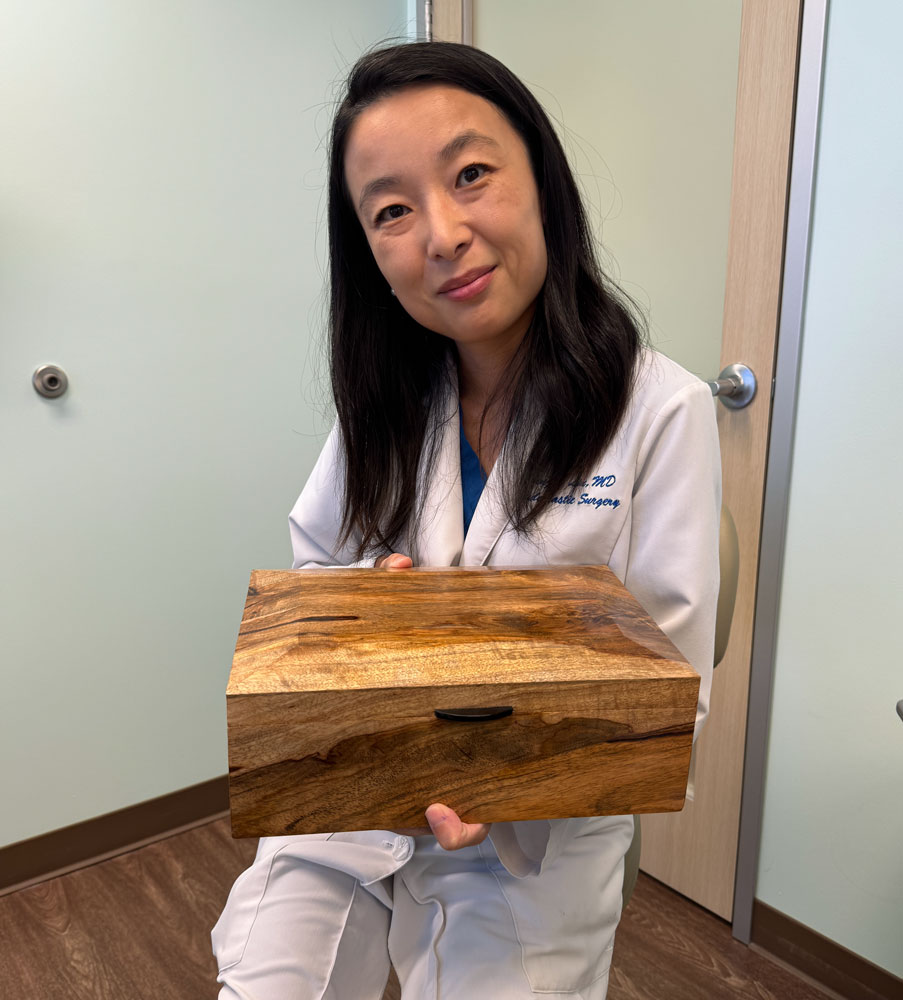
7/10/2025 I had some basal cell cancer on the lower eyelid of my left eye. Basal cell cancer is not that dangerous but it was in a bad place on my eyelid. I had it removed with a Moh's procedure but that then required reconstruction surgery. I had seen Dr. Liu, who specializes in surgery around the eyes, and she performed the reconstruction on July 3rd. I needed something to do while recovering from the surgery and decided to make a box for her. Here's how it came out. I used about the last of this wood that I had.

And here's Dr. Liu holding the box after I presented it to her.
+++++++++++++++++++++++++++++++++++++++++++++++++++++++++++
6/30/2025
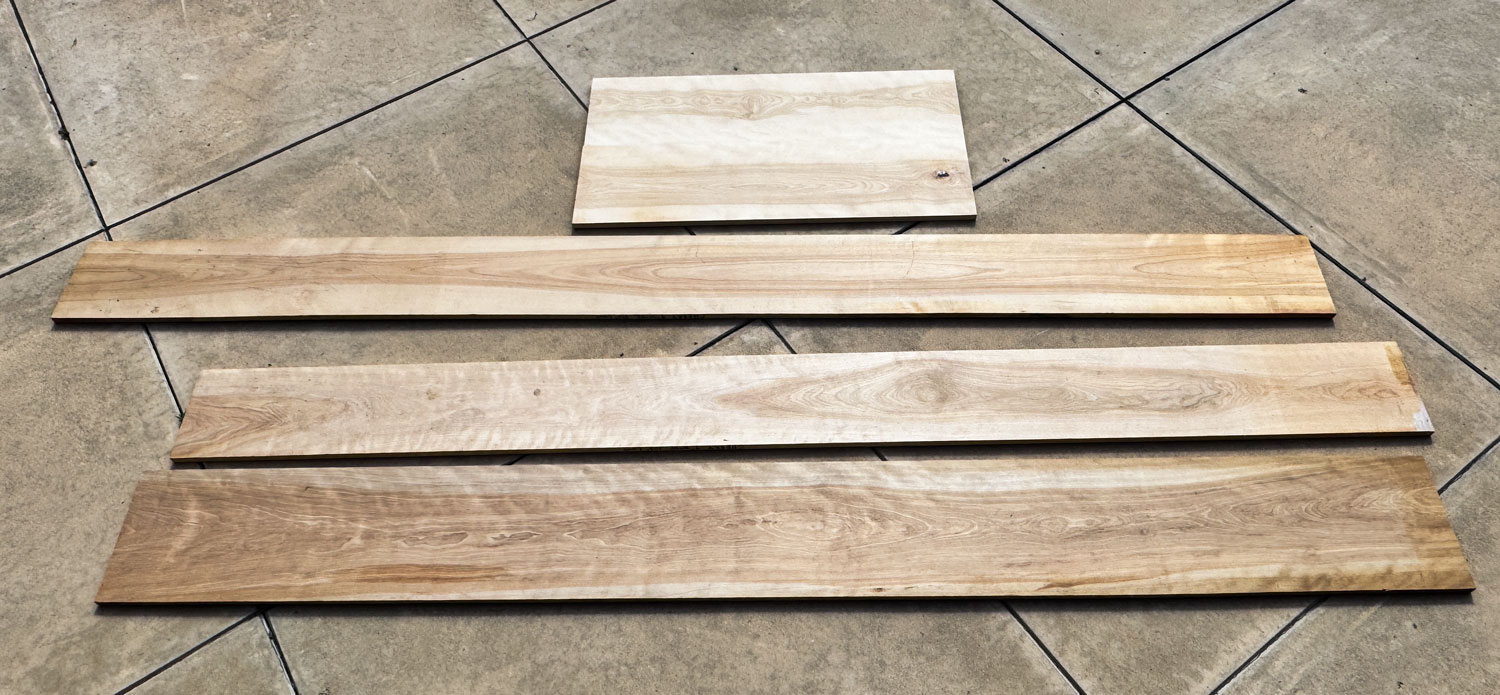
A few months ago, I purchased some wood from an estate sale. In the bundle
were some cherry boards, but they were not very nice - lots of sapwood and
the heartwood was not very dark. At first, I thought about using it in a
project, as is, but then decided to veneer it. I had some figured cherry
veneer in the shop and bought some additional from Certainly Wood.
Here's the wood, as I received it, except that square piece at the top,
which is a board I cut and glued up, side-to-side. I had started working
with it before I thought to take a picture. For size comparisons, that's to
be the top of the chest of drawers, 30 inches long, by maybe 20 inches wide.
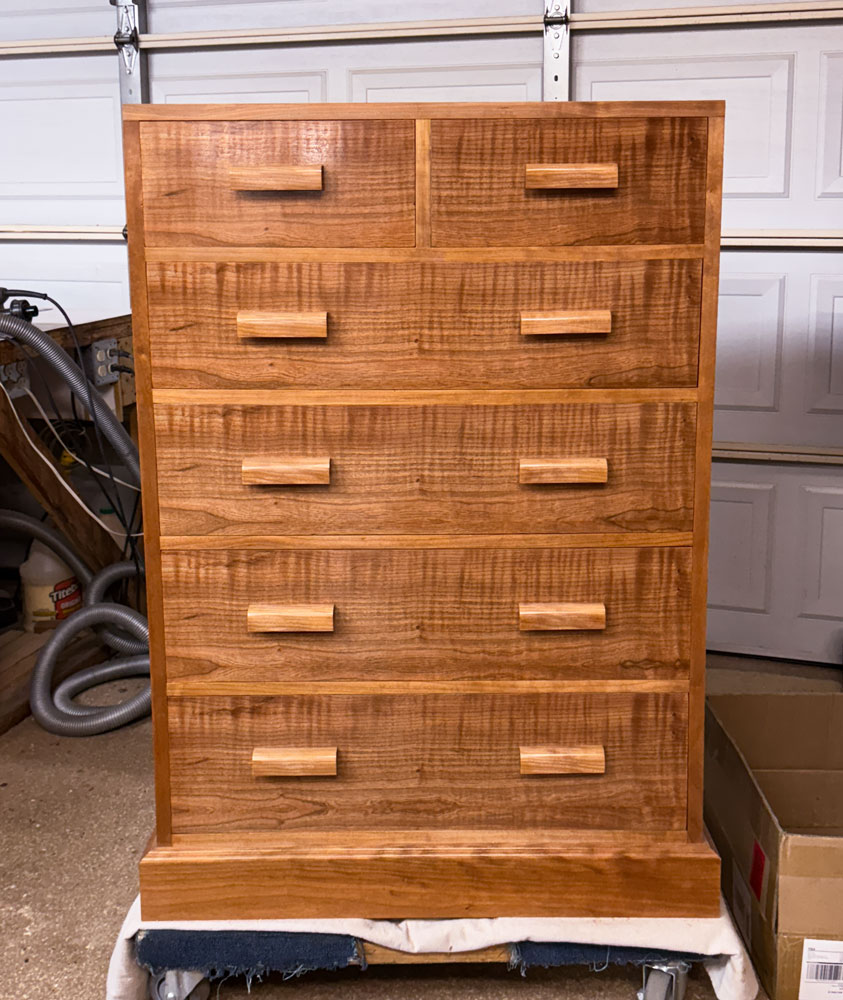
The design is based on a chest a talented woodworking friend, Jay, built
many years ago. It's sort of Shaker style, with modifications.
I took some intermediate pictures but here's the finished chest. It's 40
inches high, excluding the 4 inch base (so 44 inches from top to bottom).
The chest is 30 inches wide and it's 19 inches deep. The drawers - from the
bottom to the top - are 8 inches, 7.5 inches, 7 inches, 6 5/8 inches, and
the two at the top are 6 3/8 inches high.
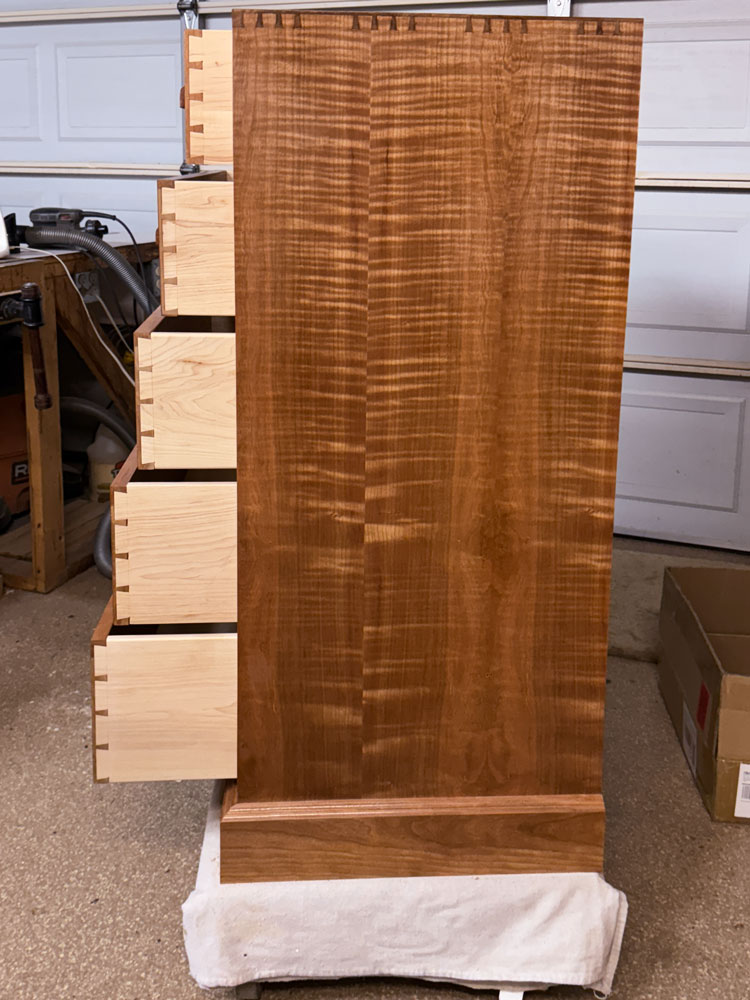
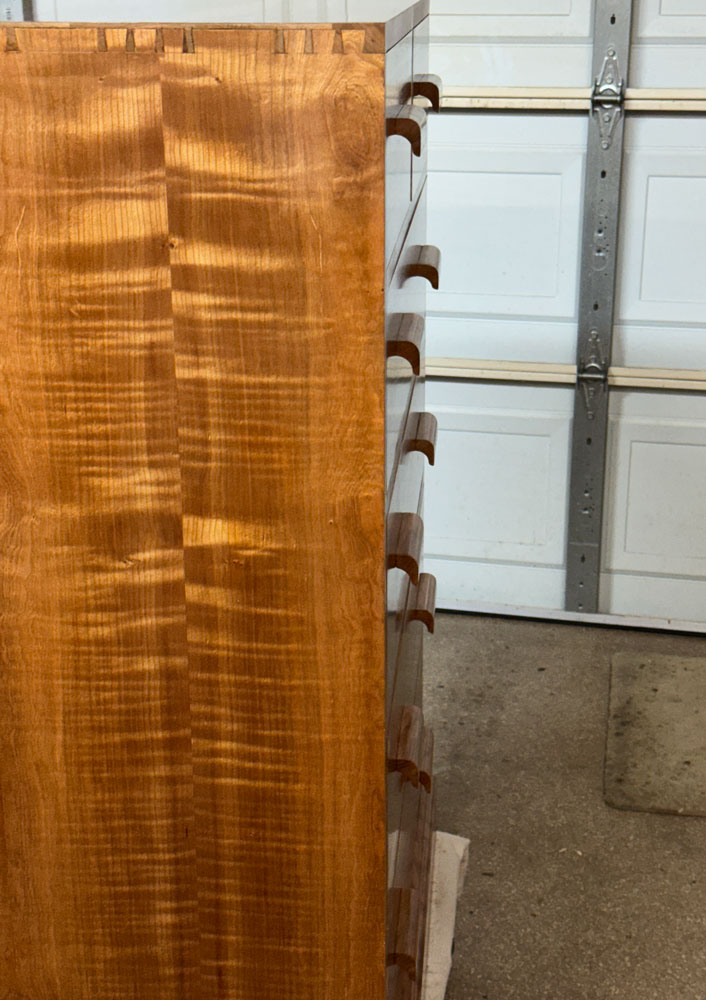
Lots of hand-cut dovetails. The bottom is half-blind-dovetailed into the sides and
the sides are half-blind-dovetailed into the top.
For the drawers, I made the dovetails with four tails on each drawer, making
the tails smaller as the drawers got smaller. So each drawer has four tails.
The dovetails at the back of the drawers are the same four tails as the
front, but they are through dovetails, not half blind. I put off gluing the
dovetails on the drawers in case I had to make some adjustments to fit the
drawers into the case. They're still not glued and I probably won't glue
them.
The secondary wood is maple, half inch hard maple for the drawer sides, with
quarter inch Baltic birch plywood for the bottom of the drawers. The drawer
supports are 4/4 soft maple, with cherry glued on the show face, and quarter
inch plywood on the bottom of the drawer supports. Some people call this a
"dust shield" but what it's really used for is to provide a smooth surface
to the bottom of the drawer support so that if someone stuffs too much into
a drawer, it won't hook on the drawer support.
The drawer supports are installed into stop dados, 1/4 inch deep.
The drawer pulls are definitely not Shaker but my wife did not like the
round knobs that the Shakers used. They are based on a pull that I found on
YouTube.
A view of the top. I left that streak of sapwood just for an interesting design element.
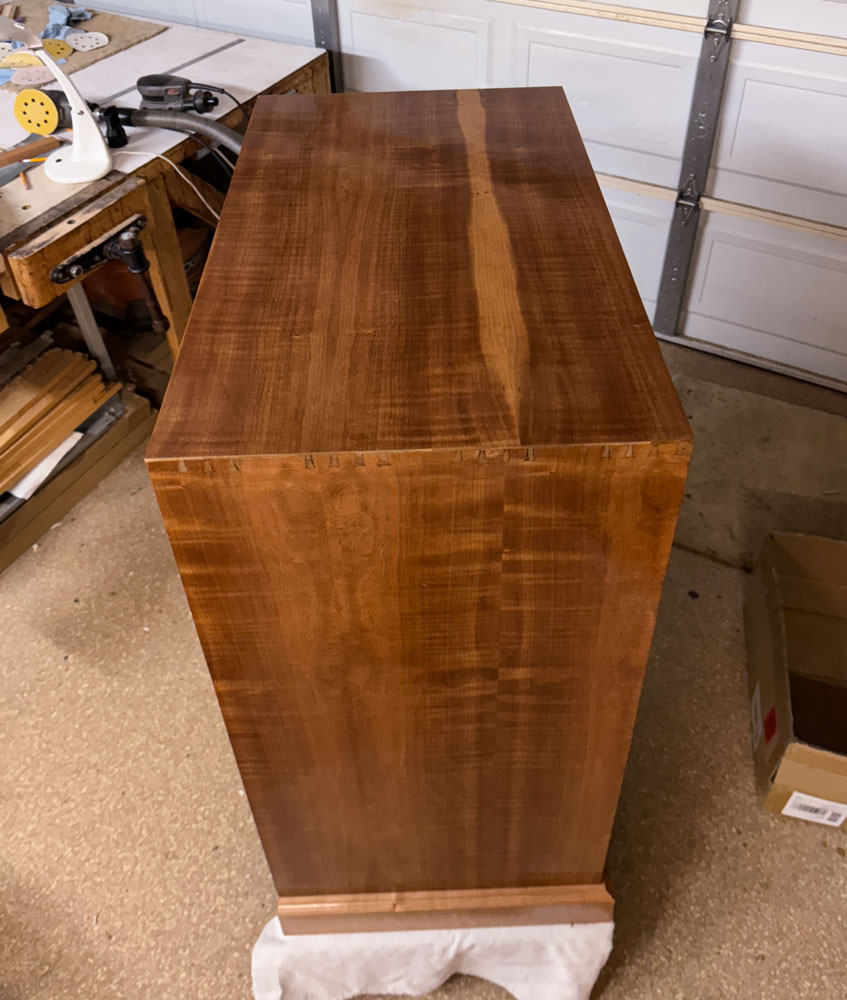
And of the back.

There's a lot of wood in the project. The top, sides and the fronts of the drawers are that ugly cherry with veneer on it. The back is oak with cherry veneer. The panels on the back are plywood with cherry veneer. The internals of the base are oak, with a facing of nice 4/4 cherry. The reason for the oak is that's what I had in the shop, and it's not visible. The chest is heavy, even with nothing in it.
The finish is wiped on dewaxed shellac (SealCoat), with Target Coatings EM6000 water borne lacquer over it. I started the project on May 13, 2025, so it was 48 days from start to finish.
[Added note: Here's a view into the case, without the drawers. I put in a center guide bar for each drawer but I don't think it made much difference. The drawers are really guided by the sides of the chest. I built another chest of drawers many years ago and didn't put in the center guide bar and I can't tell the difference in the operation of the drawers.
One problem with the guide bars is that you have to raise the bottom of the drawer a bit - 1/4 inch for me. I would normally put the bottom into a set of grooves 1/4 inch from the lower edges. But with the guide bar, I had to go to 1/2 inch to leave space for the guide bar. You lose a small amount of space in the drawer.
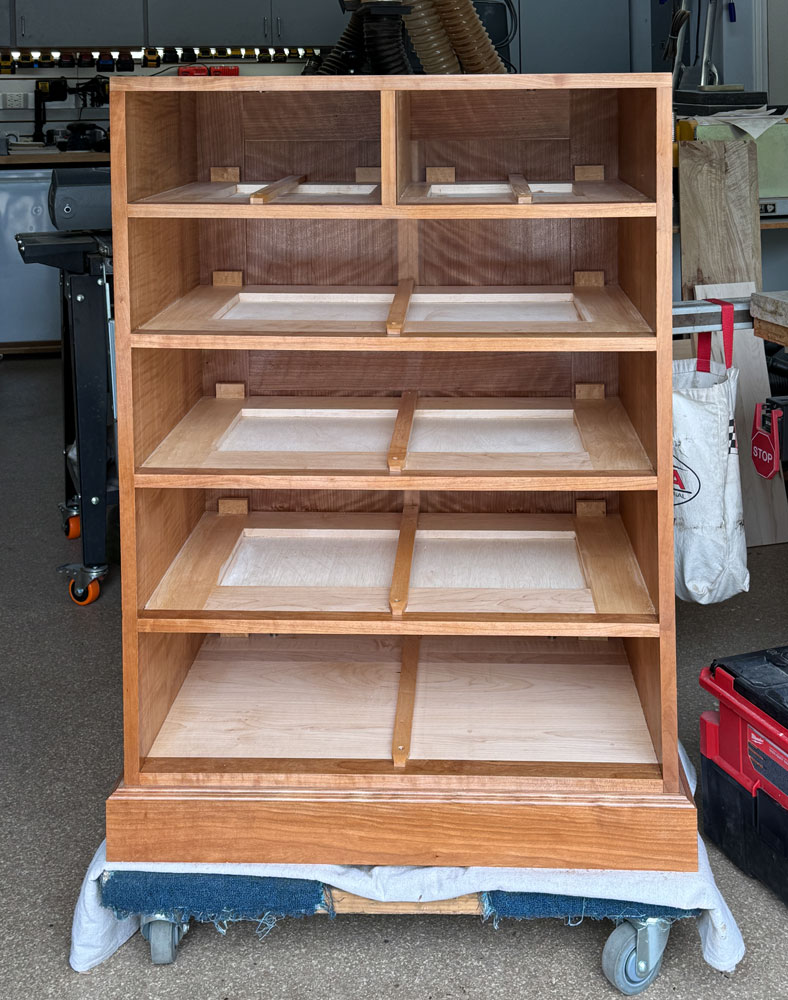
The small blocks of wood at the back of the drawer supports are drawer stops
- so that the drawers line up properly with the front of the chest when you
close a drawer.
One other comment. It helps to wax everything that a drawer will rub on
(bottom of the drawer sides, sides of the drawers, and sides of the case).
Makes a real difference in the ease of closing and stops jamming. I tried
bees wax (long ago) but found that petroleum wax (paraffin) works much better.
Here it is installed in our bedroom.

++++++++++++++++++++++++++++++++++++++++++++
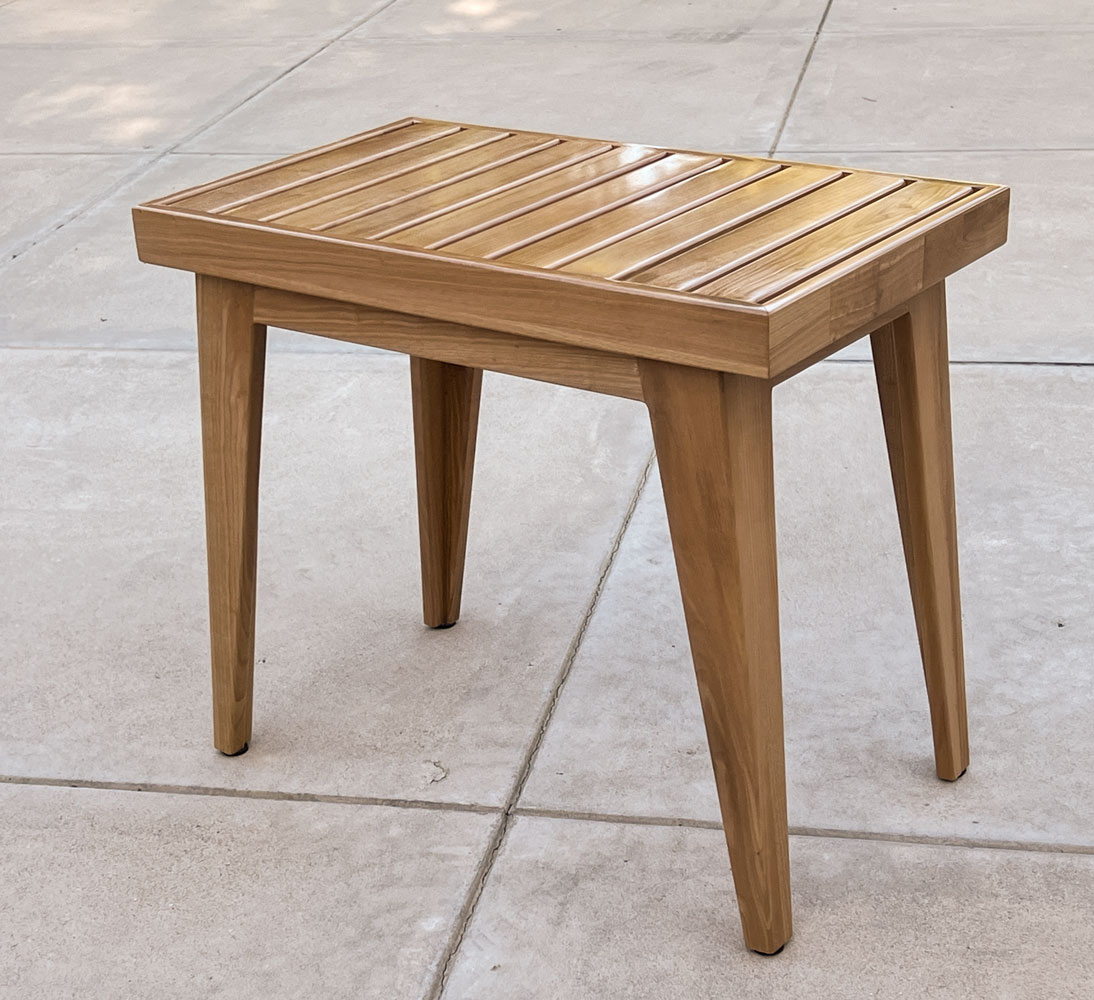
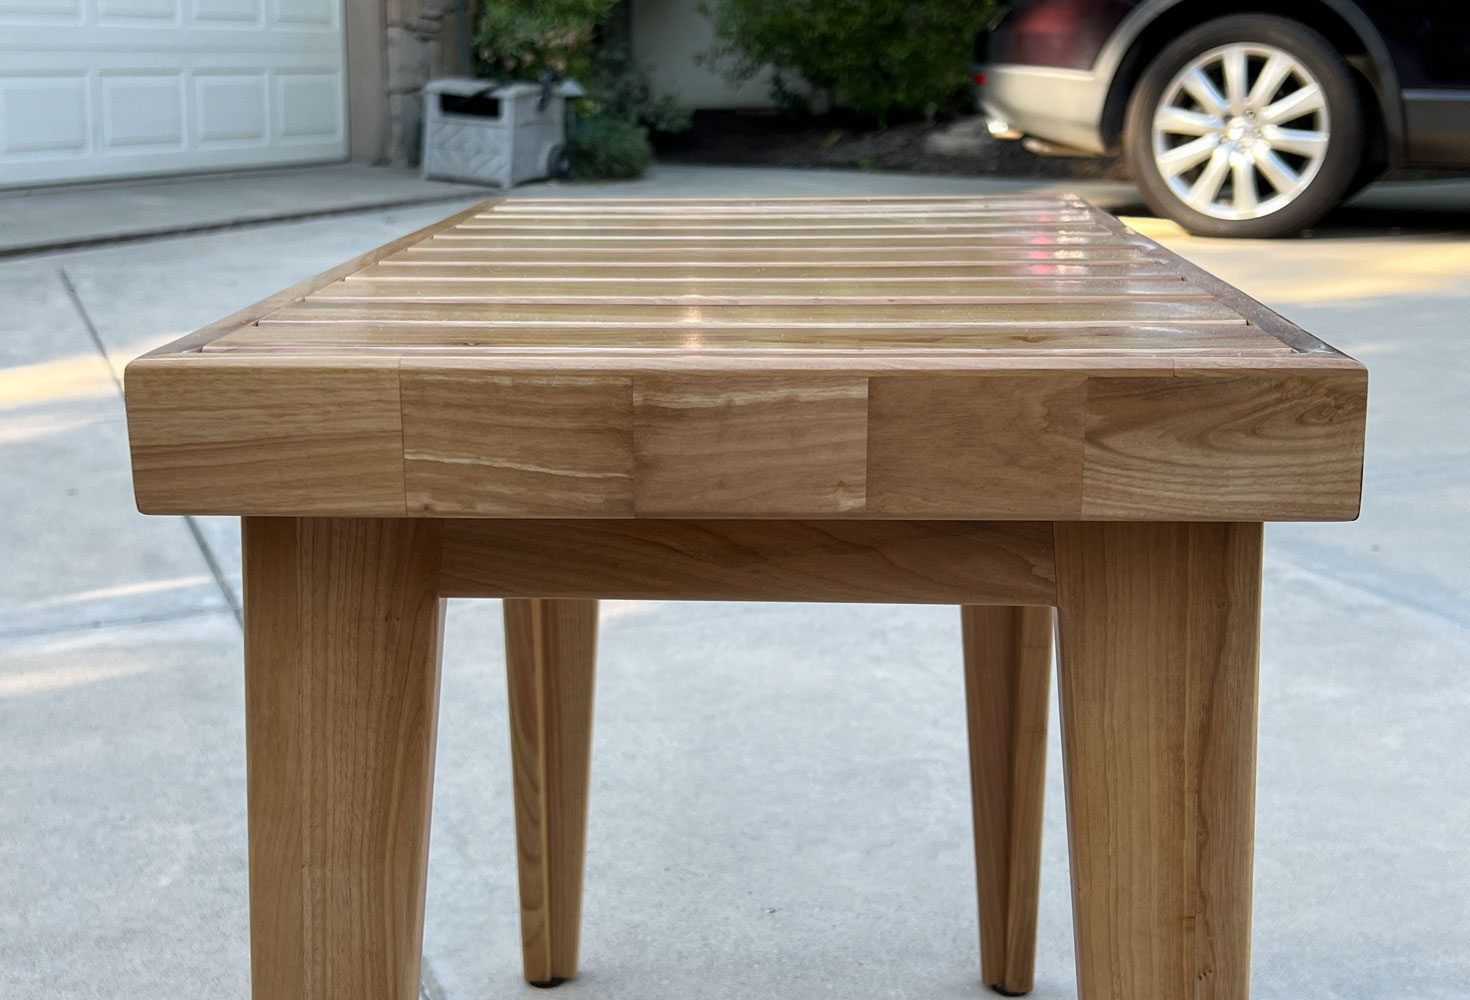
4/9/2025 Last year I bought some wood from an estate sale. A lot of it was oak, although there were a couple of boards of cherry (mostly sapwood), one or two boards of maple, and (surprise) two nice boards of mahogany. But this project is about the oak. I decided to use it to make a small (kitchen size) expanding (drop leaf) table. It's 30 inches by 34 inches when closed, and 30 inches by 52 inches when open.
It came out well in the mechanical parts, but I struggled with the finish. Oak has a deep grain which left the grain too visible in the finish (deep depressions). I bought some grain filler but was not satisfied with any of it.
I finally did "finish fill" - that is, I applied finish, then sanded the finish down. That left finish in the grain pores without building up a thick coat on the main part of the table top. I did that three times and finally got a fairly smooth finish. Here's the table with the leaf dropped.

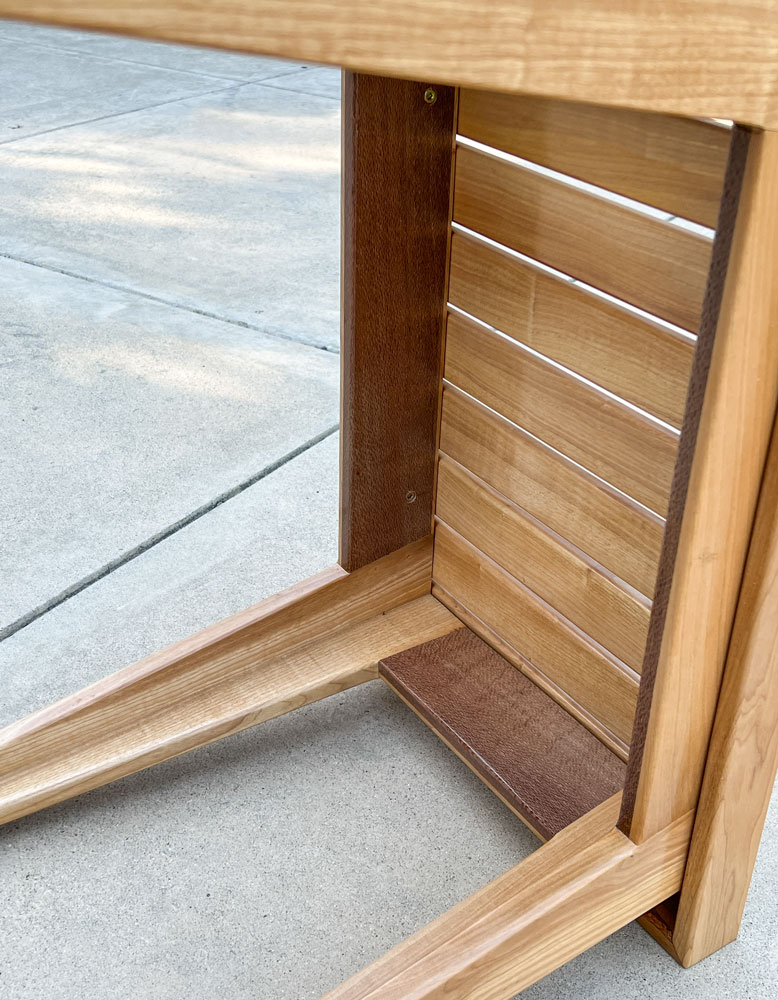
The way the expansion works is that the aprons on the side have a dovetail slide. The inner apron has a dovetail shaped dado cut into it and I made a matching dovetail slide in maple that I attached to the inside of the outer apron. When the table is open, the dovetail dado is visible - you can see the dovetail dado in the apron. I was afraid the sliding dovetail would not be strong enough and ordered a set of table slides, but after making it I was convinced it's quite strong.

In use, the table would be placed against the wall, with the drop leaf against the wall. That way, up to three people can use the table. When extended, it can be used by six people. With 52 inches on the side, each person would have 26 inches, which is a bit smaller than full size tables but definitely usable.
I'm not a big fan of light wood furniture but people tell me it's the style today. I probably would have stained the wood darker.
We didn't have a place for the table in our home, so a friend is "fostering" it for us.
+++++++++++++++++++++++++++++++++++++++++
10/10/2024 A friend saw a small box I had made and asked me for a "pencil box". I explained that pencil boxes were usually small, but that's not what she wanted. She wanted a larger box but long enough to put pencils in. This is what I made for her - it's about 8 inches long. I flipped this picture horizontally because I thought the box looked better that way.

It's simple, just a box with a top that comes off. Here's a look inside. The wood is some that was given to me - I think it's from southeast Asia. It's tight grained and not too heavy.

9/4/2024 I was contacted by someone who asked me to build four cremation ashes boxes. They had a person in the family who was expected to pass away soon and planned to put a portion of the decedent's ashes into each of the four boxes, with one box going to each family member. They will also have the tops laser engraved with the decedent's name and birth and death dates.
Here's what I built for them. The center of the top is figured maple, surrounded by 1/8 inch ebony. The primary wood is African mahogany. With time, the mahogany will age to a much deeper reddish color.
[Added note: The boxes are 6.5 inches by 6.5 inches by 3 inches.]

6/11/2024 - I built one more of the teak and olivewood jewelry boxes so that I could do a tutorial on how to make it. Here's a picture of that one.

4/24/2024 - Some time ago, I made a small panel from reclaimed teak, olivewood, and ebony that was to be used on a project. That project got put on the back burner and never got done - so I decided to use the panel on a small box. I made the box out of the same reclaimed teak as I used on the top. The olivewood came from an olive tree that we had. It became infected with a virus and the tree was dying so we cut it down. I sawed the logs into boards and dried it in my attic.

Here's a view with the box open.
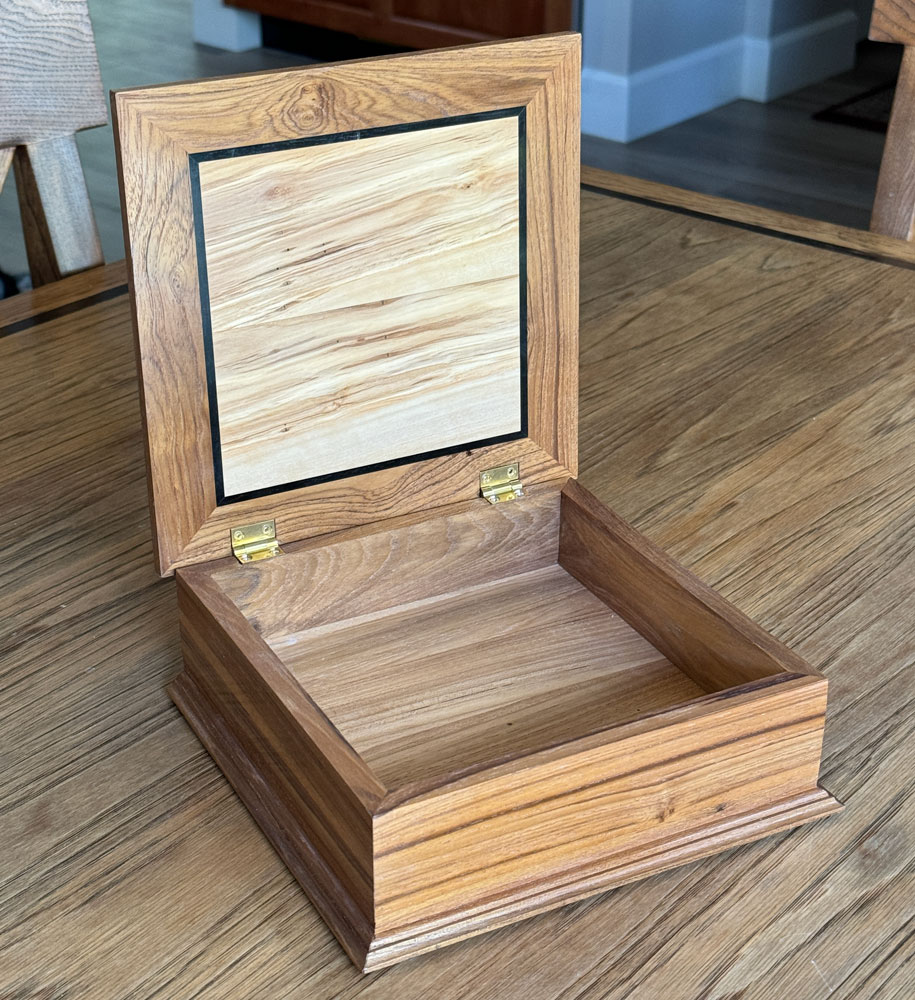
I really liked the combination of the olivewood and the teak so I decided to make a couple of jewelry boxes with the same look. Here's the first. The teak had some holes in it from screws used on it, and I filled those with black epoxy. A few holes were too large for that and I put teak plugs in, after drilling the holes to a standard size. The plugs don't show in these pictures.
I used Brusso hinges on the boxes - Brusso hinges have really gone up in price and are the most expensive part of a box project.

A view of it open.

Looking down on the tray. When I made the top, I used teak around the olivewood, and cut the teak at a 45 degree angle. Then I glued those cutoffs together to make a panel. You can see the 45 degree cut pieces in the bottom of the tray. Then I resawed the panel and glued the two pieces together. I had a limited amount of reclaimed teak so I had to "stretch" what I had. I used black tinted epoxy to fill some of the holes and defects.

I made one more box from the reclaimed teak and olivewood.

And a view of it open.

I don't know what I'm going to do with these boxes. I just enjoy the process of making them, not using them:-)
1/8/2024 I read an article by Christopher Schwarz about chisels. In the article, he commented that he didn't like "construction chisels", those ones with the plastic handles, because they were too heavy in the handle. But he said something like, "But you're a woodworker, so make new handles."
I thought that was a good suggestion and took it as a challenge. I found a set of three Buck Brothers "construction chisels" on eBay and bought them for $20 - a 1/4 inch, a 1/2 inch, and a 3/4 inch. They were rough but cleaned up well with my deburring wheel. Unfortunately, the previous owner had ground some of the back of the edge and that took some work to correct.
The picture shows the handles I made for the 1/2 inch and the 3/4 inch chisels, and the original handle on the 1/4 inch chisel.
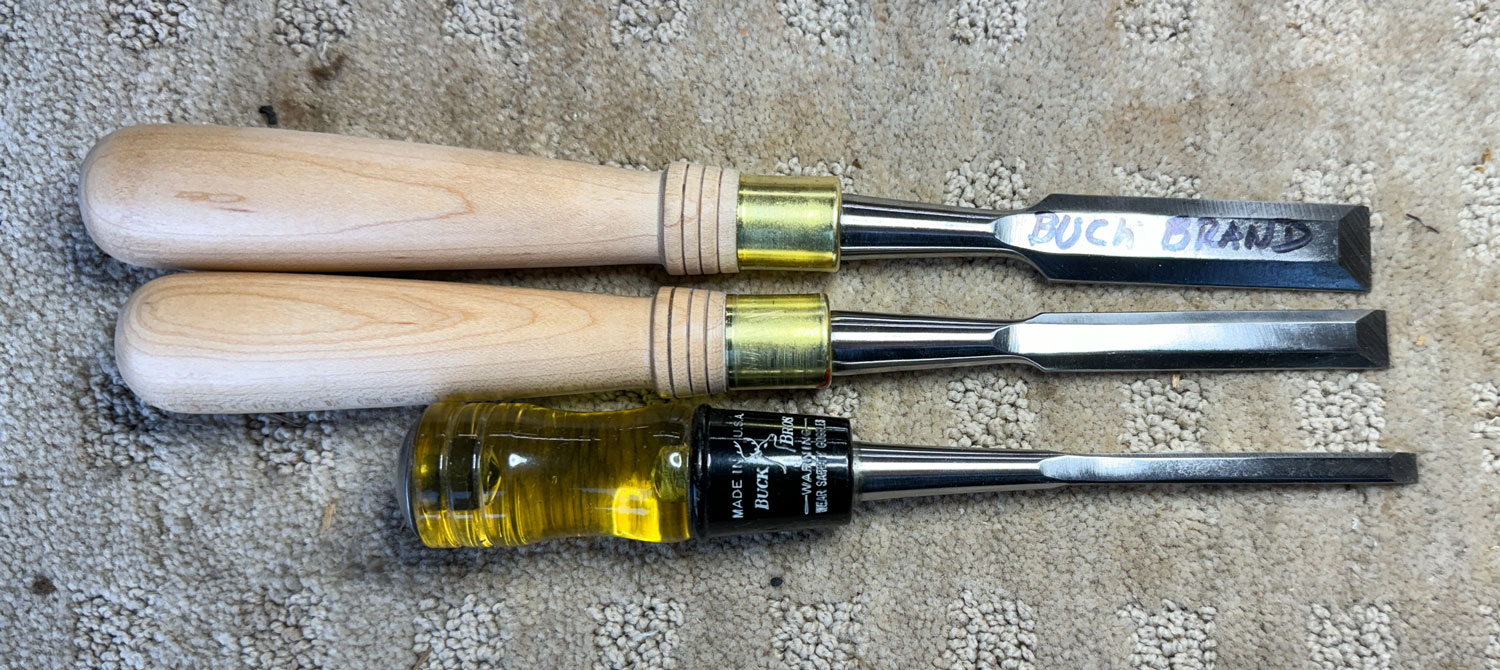
I did a tutorial on removing the old handle and making a new one. You can see it here.
+++++++++++++++++++++++++++++++++++++++++
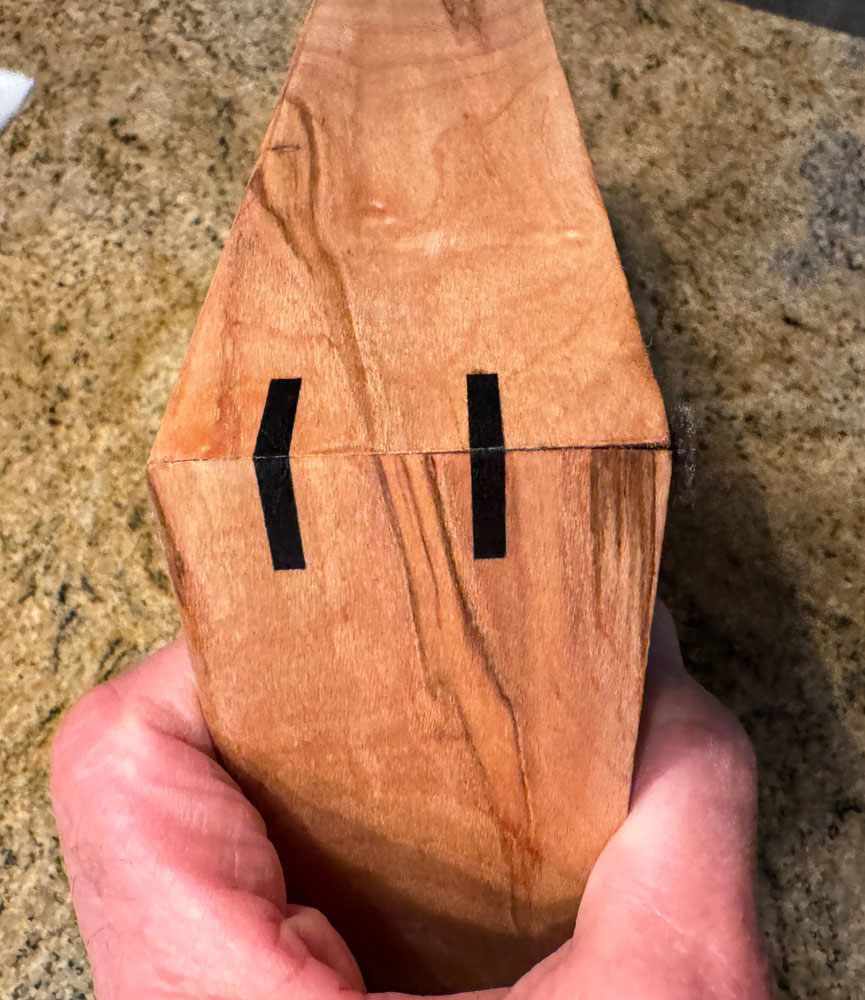
12/17/2023 Somewhere about 2015, I made a box to hold different packets of sweetener for the local coffee place, called the Coffee Grove. I glued it well and put splines in the miters (ff biscuits) but the workers are fairly rough with it and one of the corners came open. Today, I took the box back and reglued it with epoxy, and also put in two visible splines in each corner (ebony). I hope that will be enough to keep it together. The big slot is for the brown "raw sugar" packets. The other slots are for sugar, blue sweetener, red sweetener, etc.
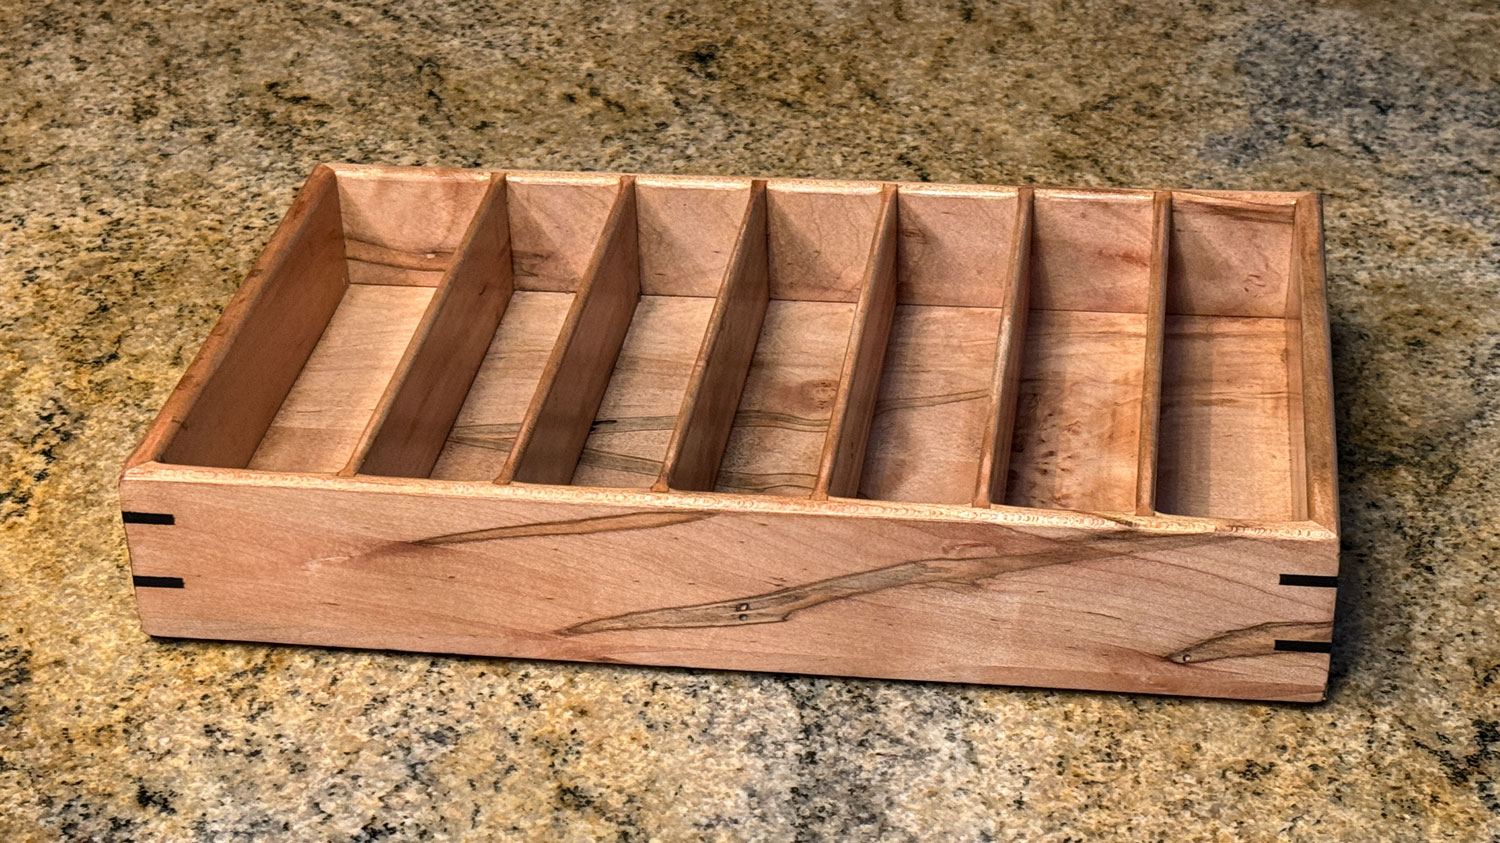
A top view. It's made of ambrosia maple.
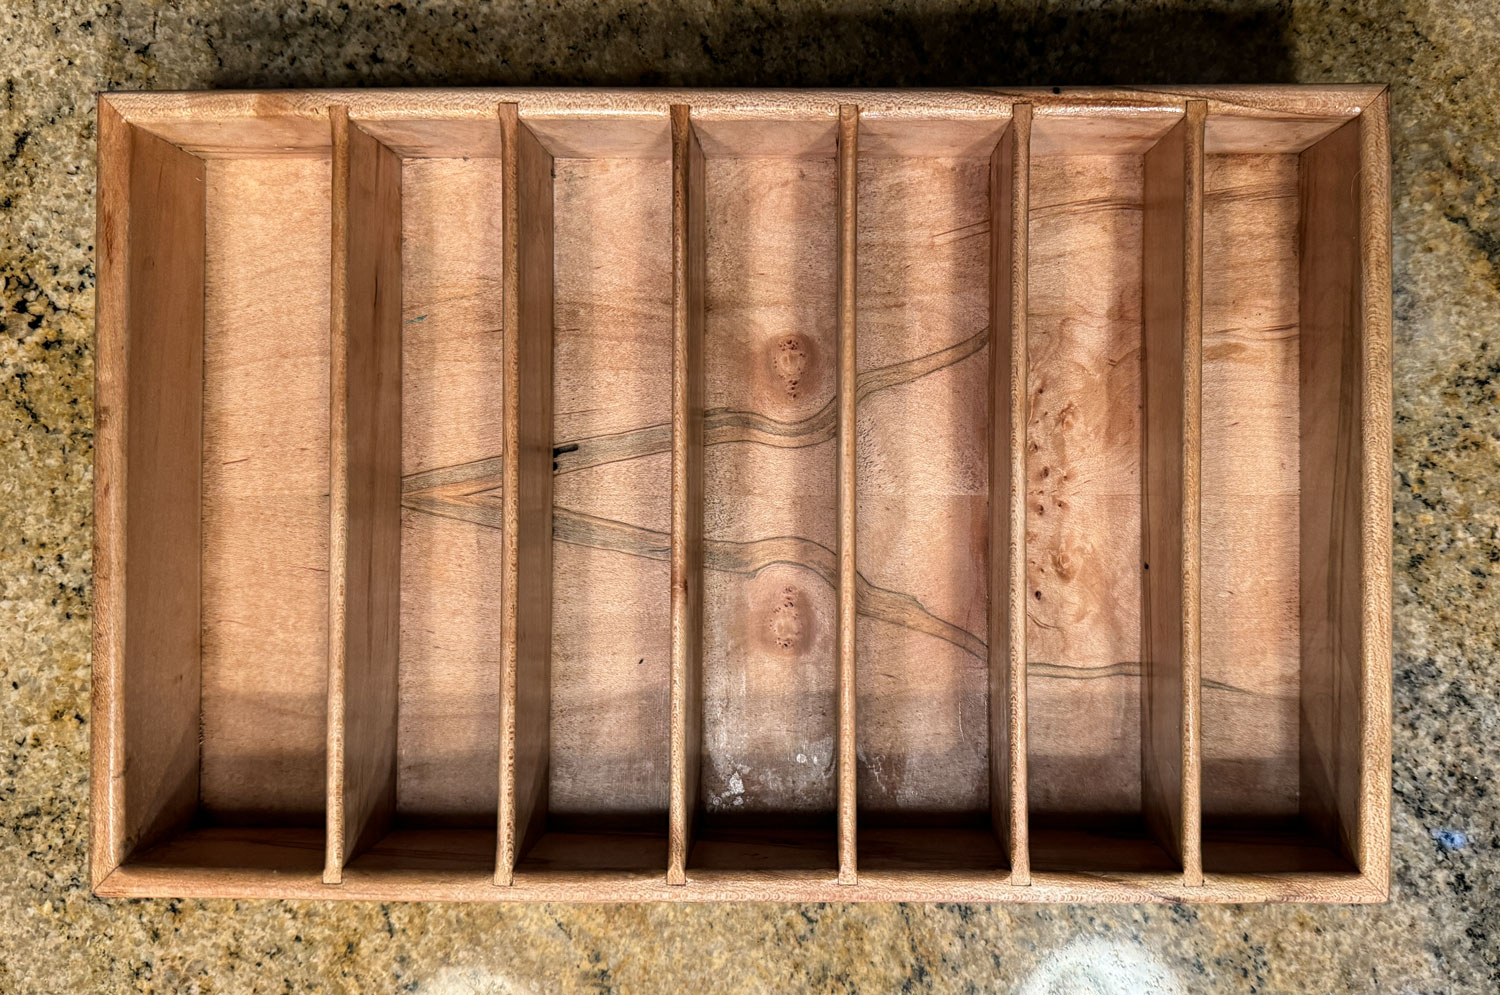
The visible splines I added. I'll get a picture of it with the packets loaded later.
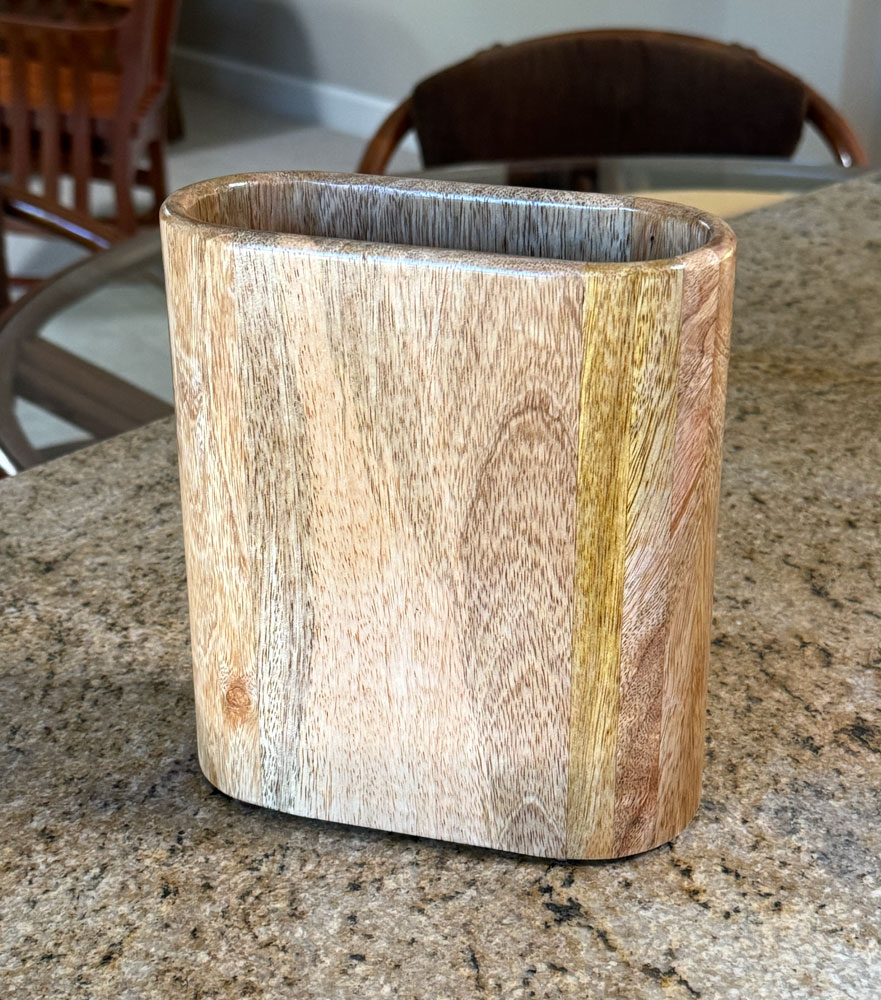
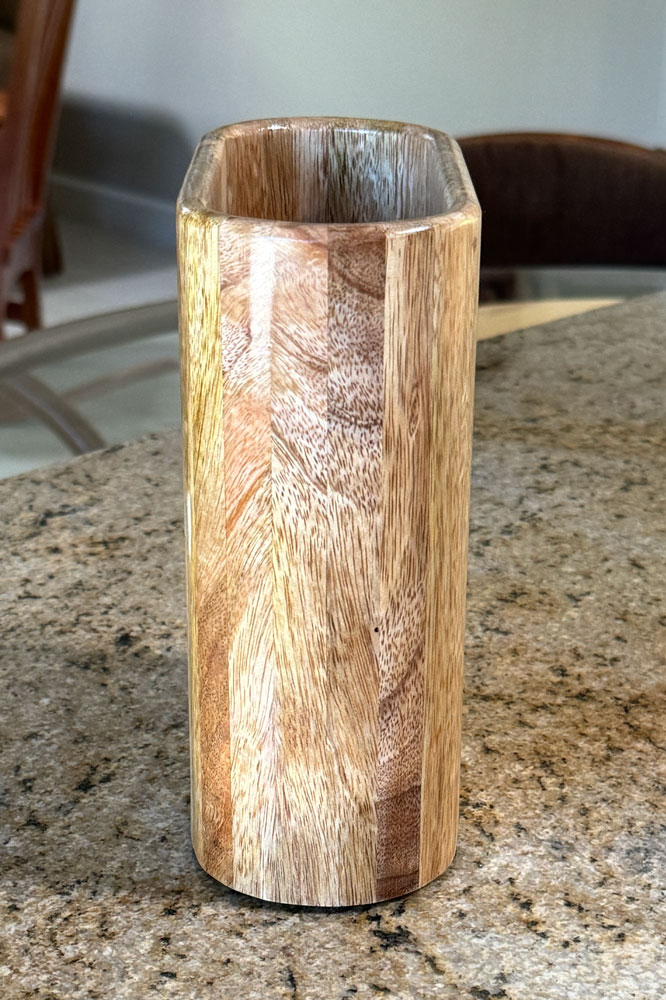
11/12/2023 A friend asked for a utensil holder for his kitchen, but he wanted it with curved ends. I explained that making it curved added to the complexity but that's what he wanted. I decided to cooper the ends and used staves about 1/2 inch wide. To get the correct angle on the staves, I made several test pieces, finally deciding on 12 degree cuts on the staves (that is, my table saw blade was tilted 12 degrees). The wood I used was some that was given to me and I don't know what it is.
You can see the staves in the pictures. I didn't measure it before I gave it to him, but I think it was about 7 1/2 inches high and 6 3/4 inches in the long width by 3 3/8 inches across. I finished it with shellac as a sanding sealer followed by water based lacquer.
Coopering is more difficult than you might expect. In addition to determining the best angle to cut the staves, it's difficult to clamp the pieces together when gluing them up. I glued them slowly, first gluing two staves together and then adding one stave at a time and figuring out the best way to clamp the pieces. It was slow work.
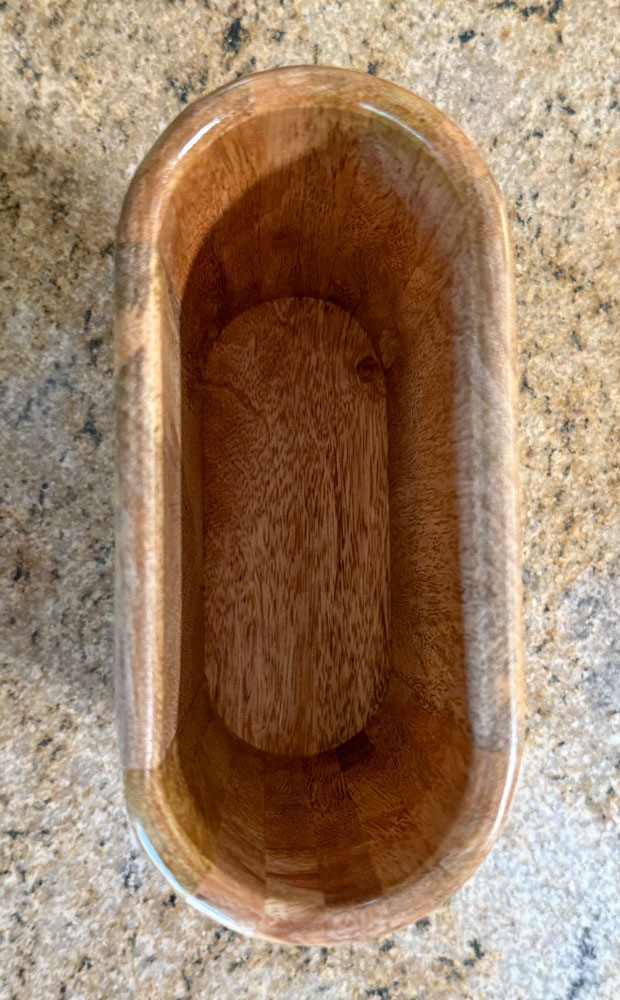
Once I got about a half circle, I sanded the half circle on a sanding board so the two edges were "flat", allowing me to use an ordinary piece of wood between the two half circles to make the box.
I cut a dado at the bottom of the major pieces and made a bottom piece to fit into the dado. It had to be installed as I glued the major pieces together. Sanding the interior had to be done by hand. The outside I sanded with a power sander.
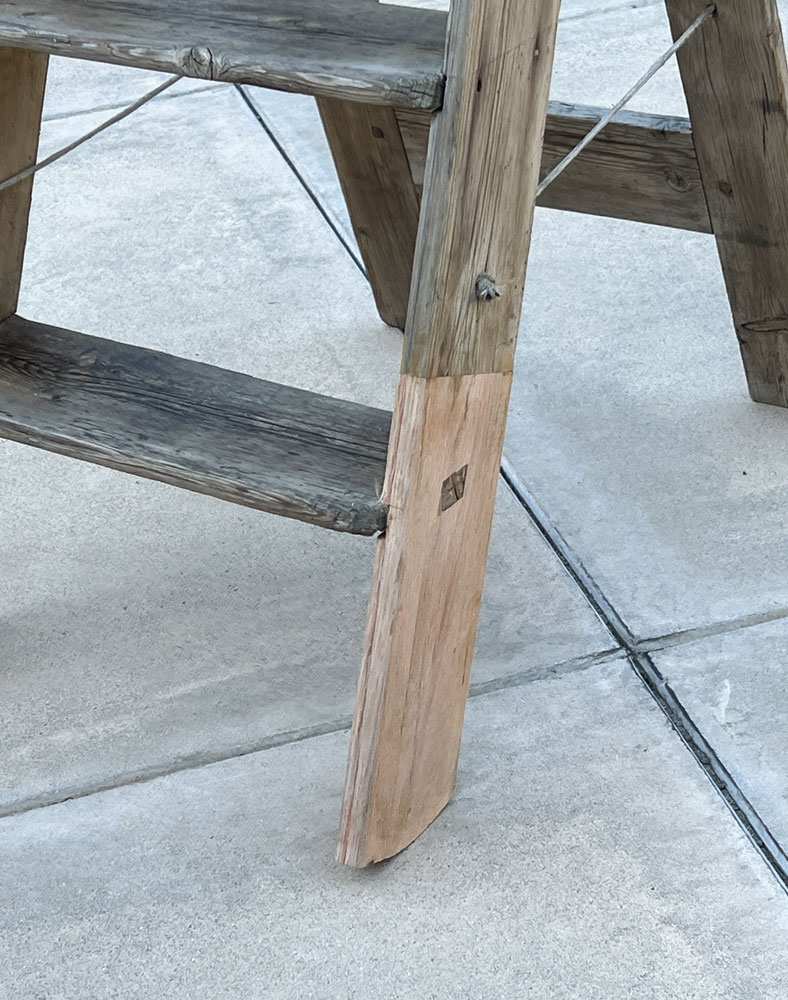
10/6/2023 Our friend, Lynn, likes antiques and has a number of old things. One thing she has is this old wooden ladder. The problem was that one leg was broken. Someone had done a repair job on it some years ago, but it wasn't a very good job.
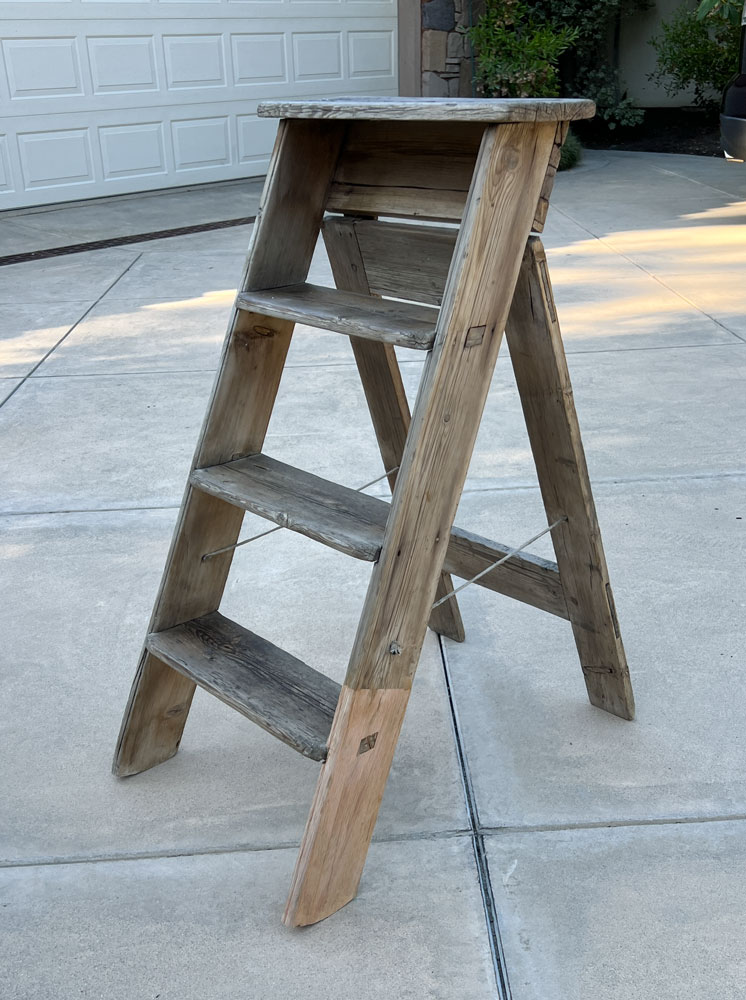
In looking at it, I decided that I could not repair the broken part and it would have to be replaced. I didn't have any wood that would match the existing ladder, so I used some oak.
I cut off (amputated:-) the leg high enough to give me room to put in three Dominoes to attach it to the old part of the leg. I also cut a dado for the step, and a thru mortise for the tenon on the step. I was pleased with how it came out. I also cut a matching groove along the front of the repair piece to match the groove in the existing wood. Lynn was very happy with my work.
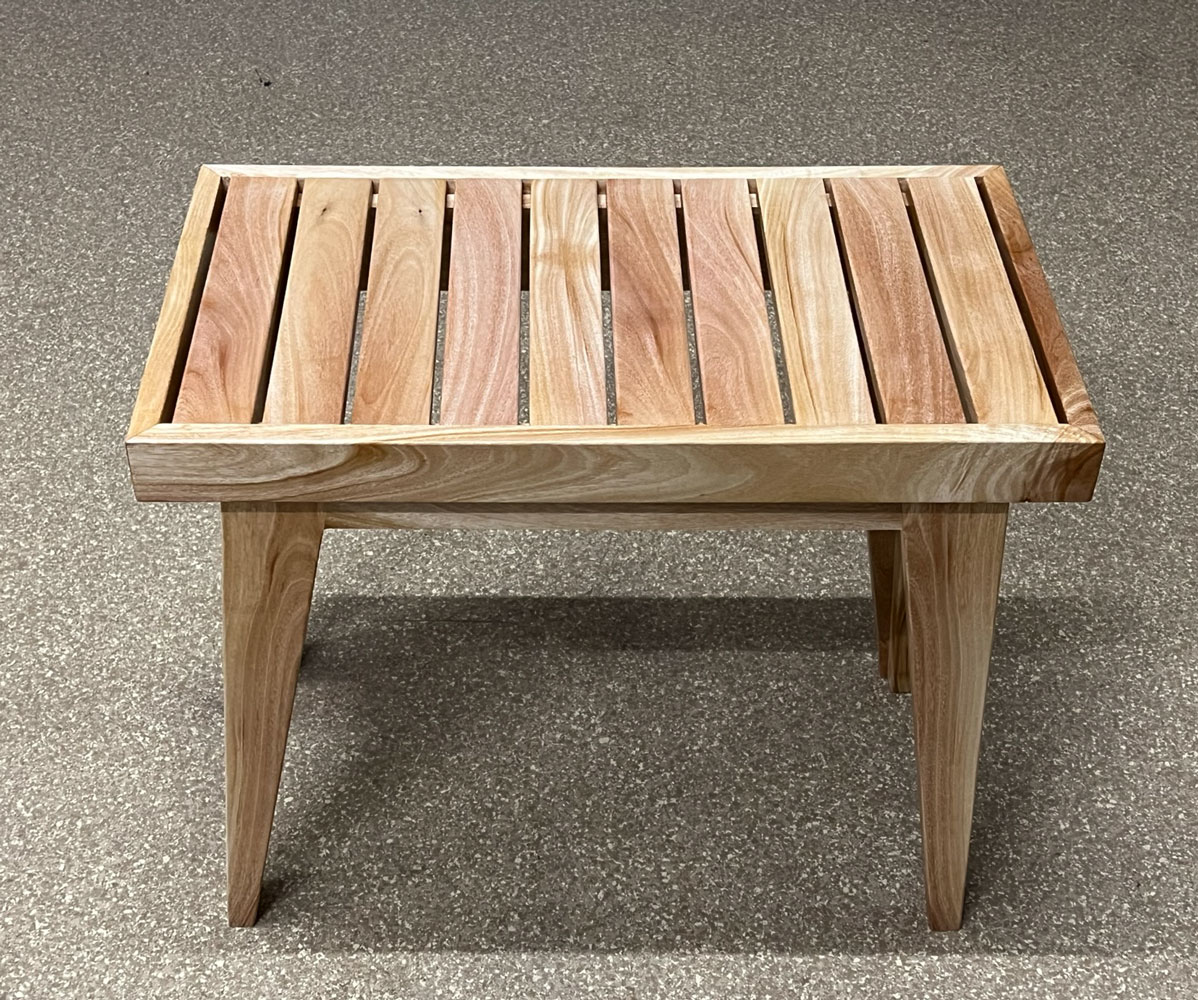
10/6/2023 Eric, a woodworking friend, passed away several years ago. About a year after he passed, I helped his wife sell the tools in his shop. Among other things, she gave me some wood that he had in the attic. The wood was from some trees he had cut down long ago, and he put the wood in the attic to dry. I used some of that macadamia wood to make a table for his wife - see the post on 10/18/2022.
The wood was heavy but not all that interesting - and there wasn't much of it. I have no idea what species it is. I had it lying around the shop and just didn't know what to do with it. I finally decide to make another bench out of it because those have sold well. Here's how it came out.
I had to glue up cutoffs from the slats to make up the pieces for the ends.
And laminate some it with some other wood that I had in the shop. I was pleased with the way it came out. It looked better than I expected.
2/25/2023 A friend gave me some wood from a tree that he cut down. It's dense and heavy but I don't know what species it is - so I call it "wonder wood" since I wonder what it is. I used it to make a bench for a friend. It's challenging because I only have a limited amount of wood and no way to get any more. But I thought it came out nicely.
Before I put finish on it, the wood was kind of purple. But with the finish on it, it's fairly brown. I finished it with shellac and then sanded the finish with 800 grit sandpaper. Then waxed it.
This one was sold with the provision that I could have it back temporarily to show at the Orange County Fair. [Update: I wound up not showing it.]
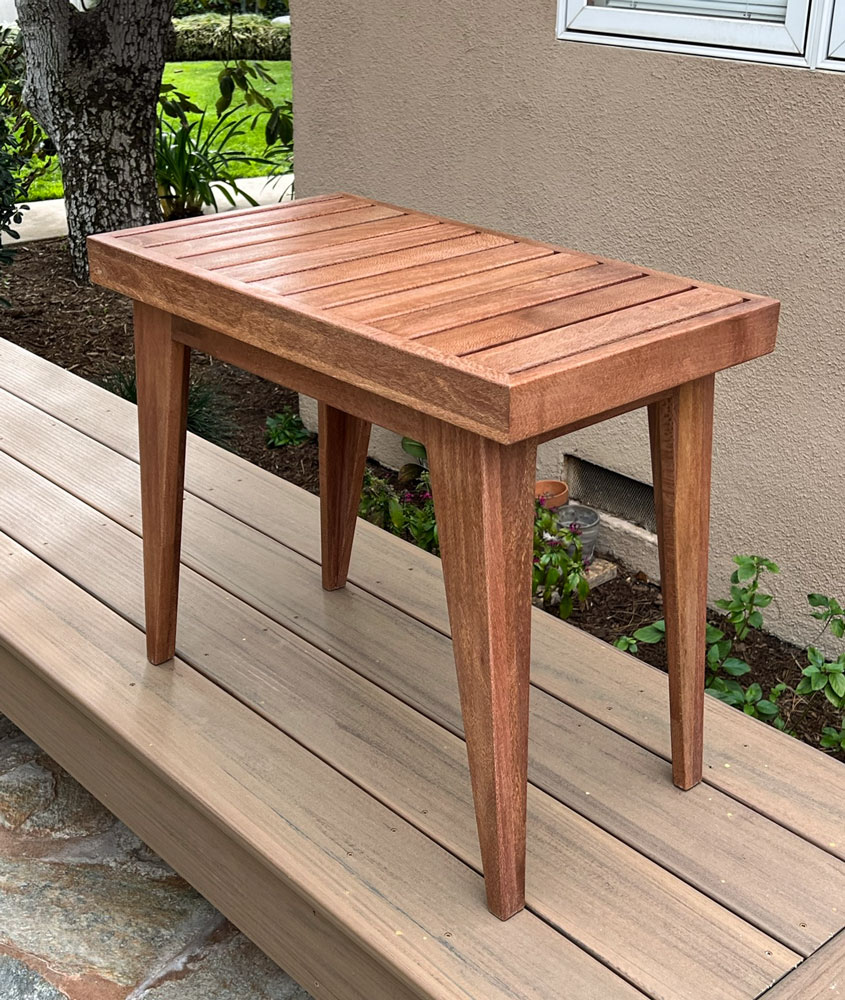
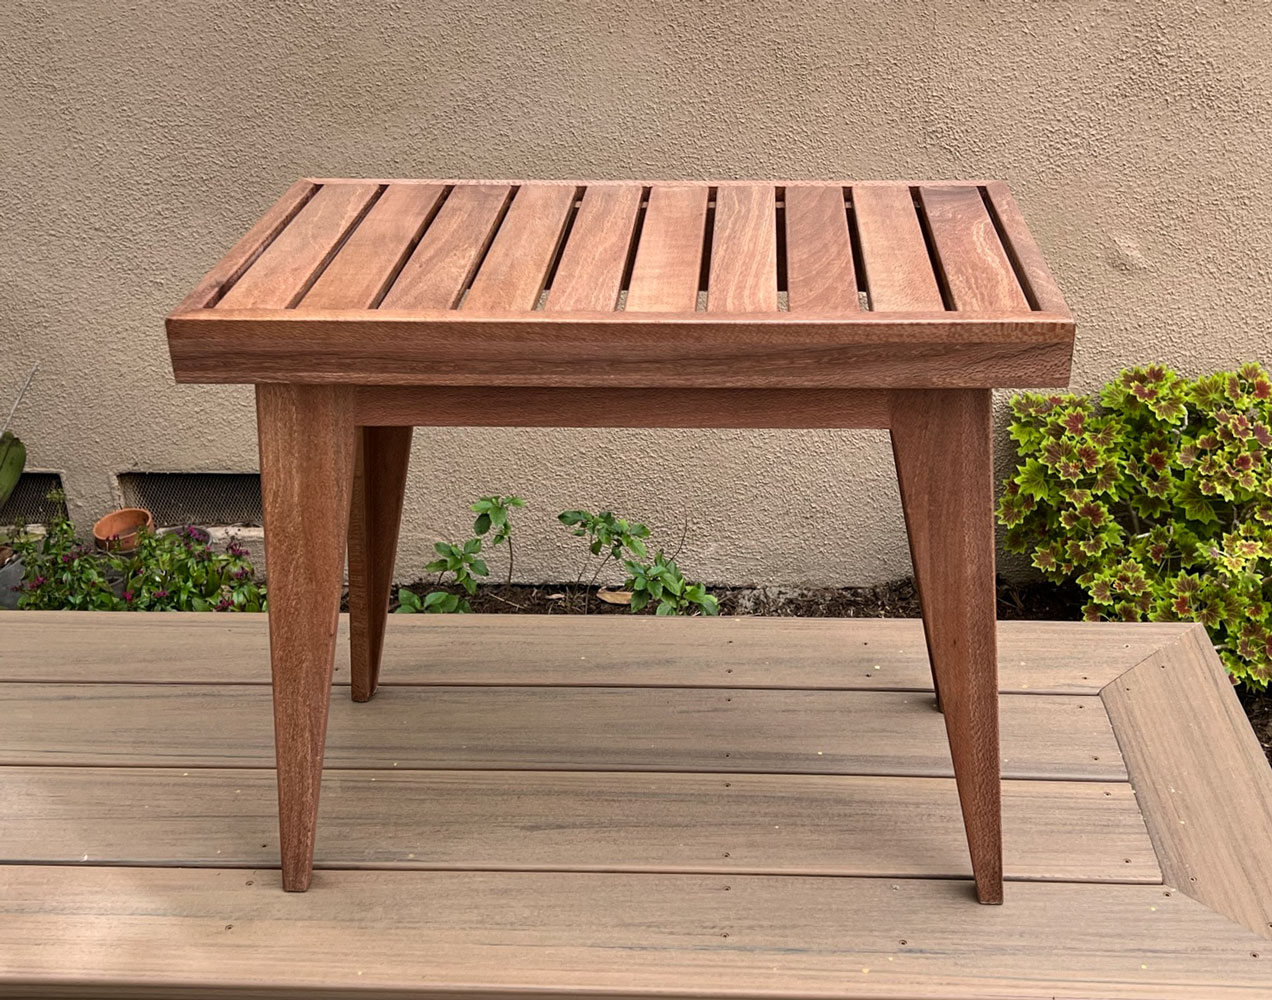
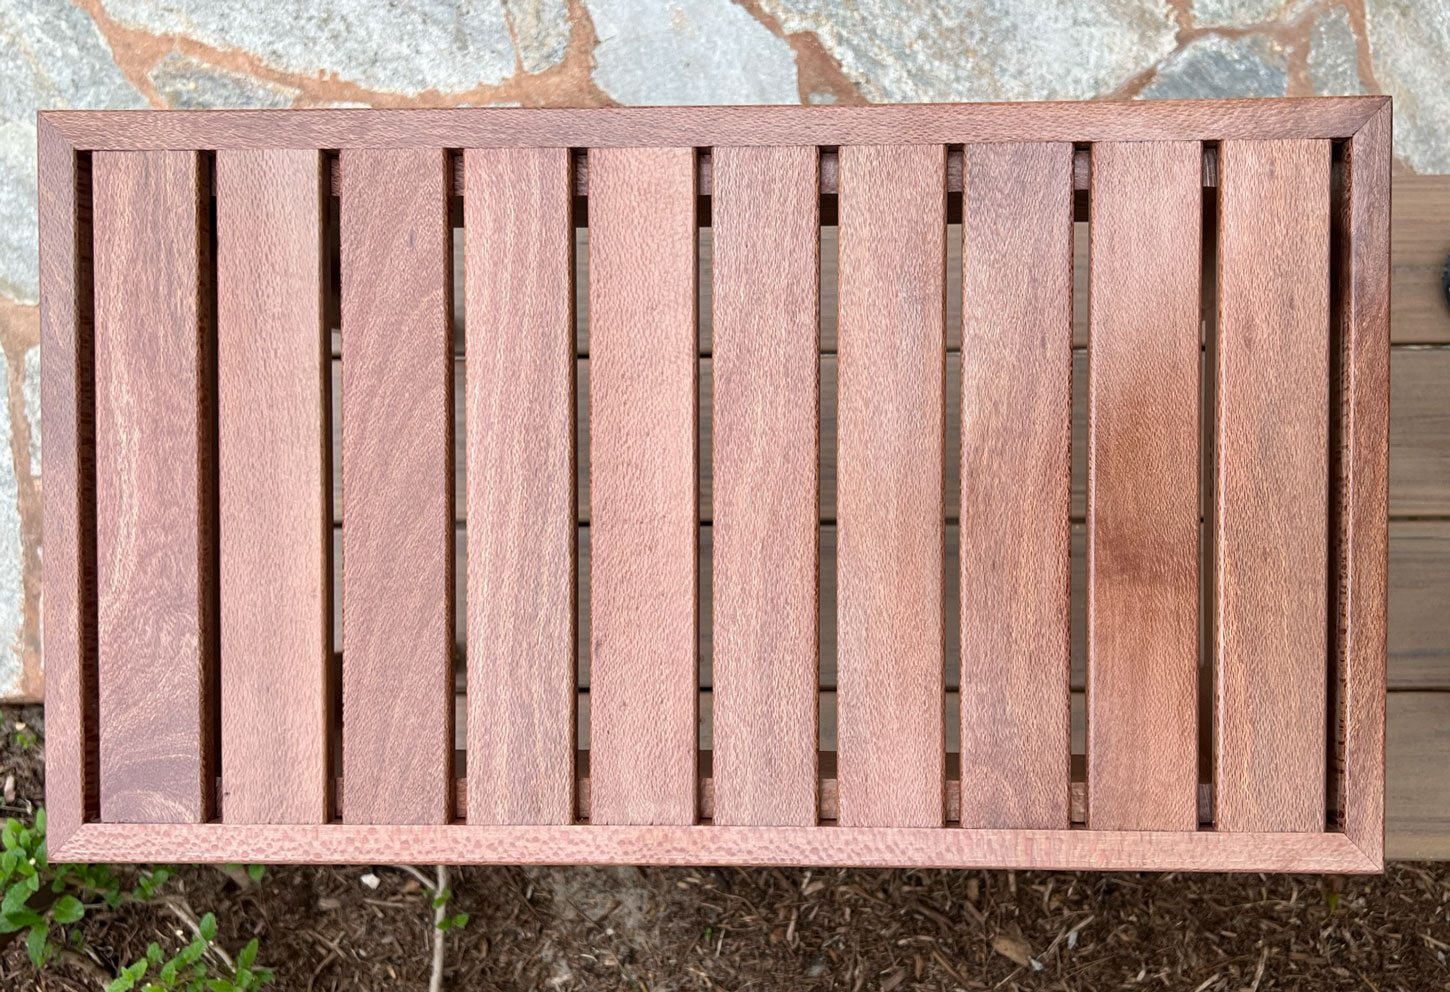
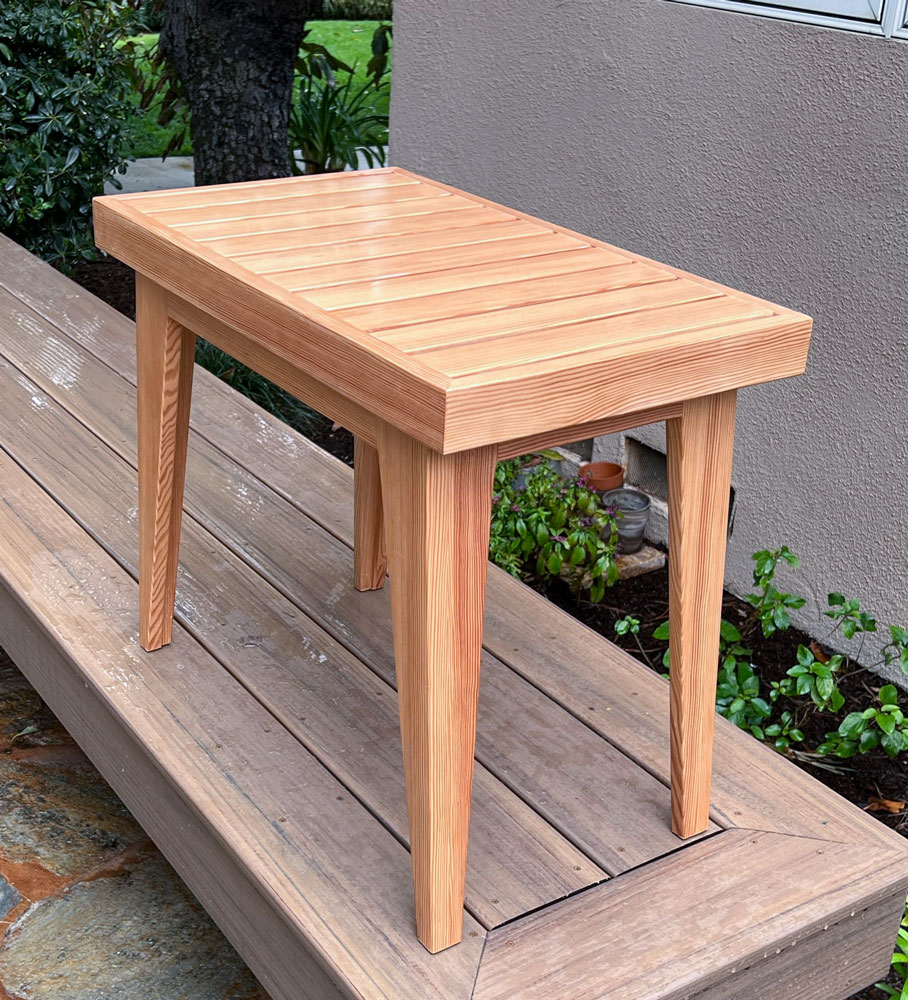
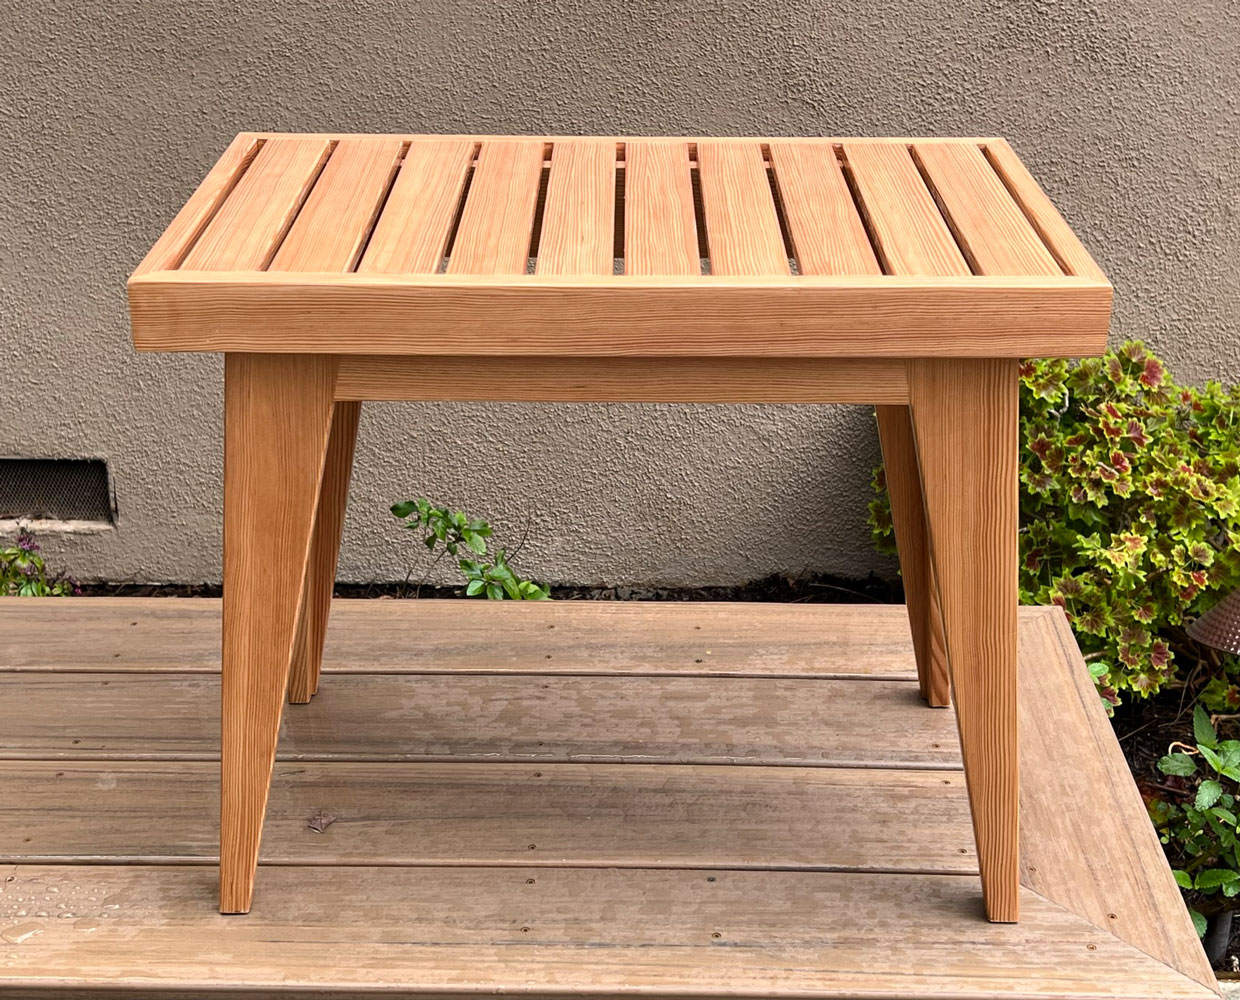
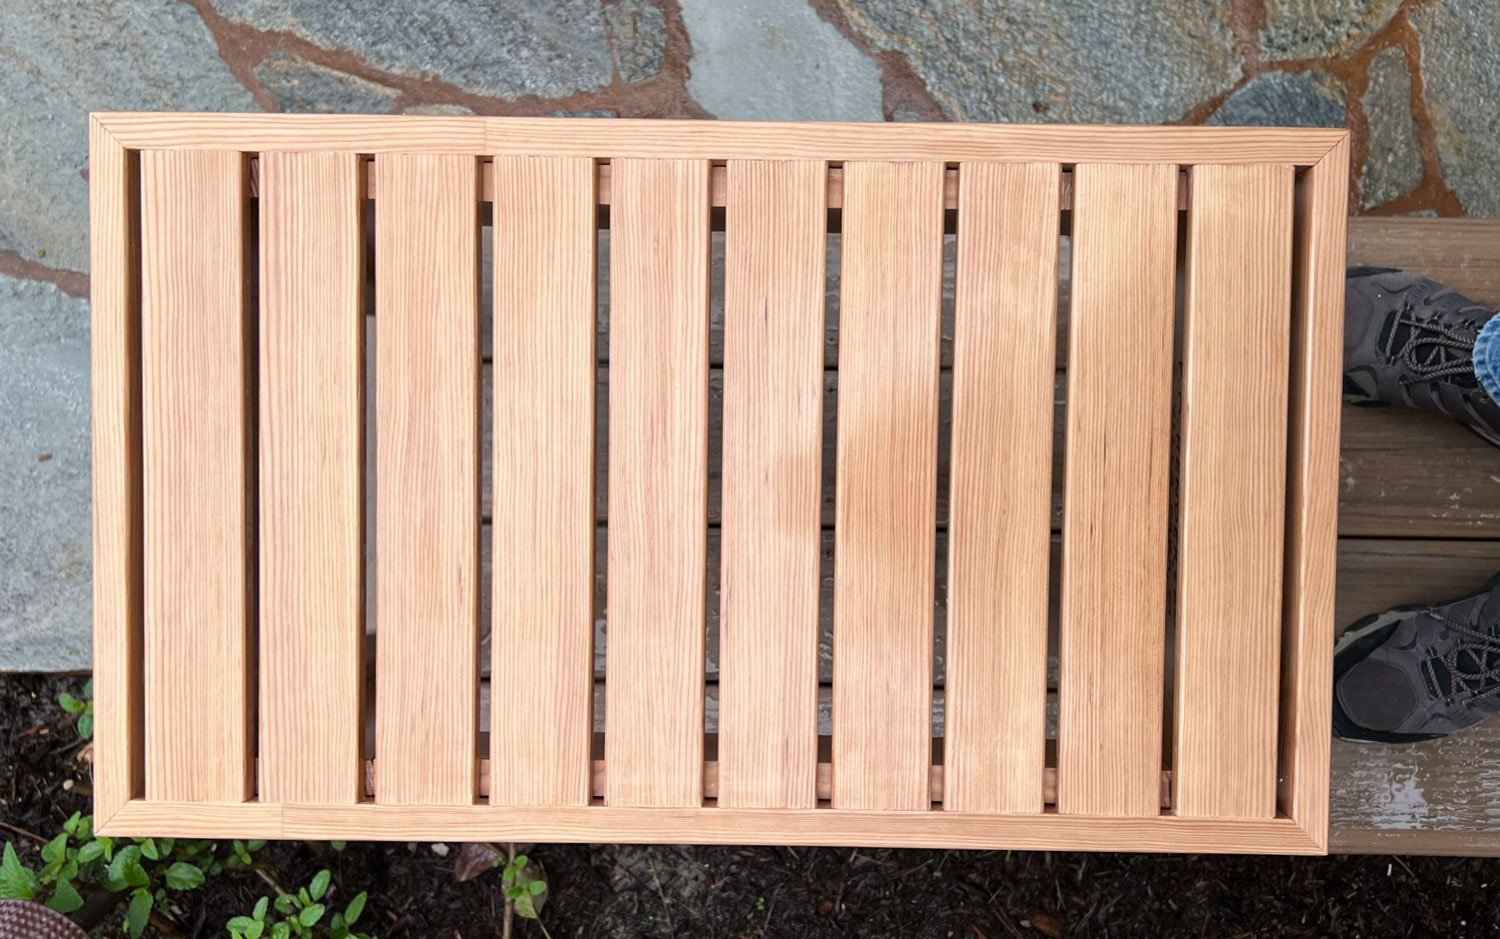
I made one more bench like this. We had our deck re-done and the workers used some 4x4's. They had a nice piece left - fir and about 10 feet long with tight grain. I sawed it so that it showed the grain as quarter cut. I really did it as a challenge to see if I could make a nice piece of furniture from construction material. Here are some pictures. I sold it to a friend.
1/8/2023 I had some avocado wood in the attic and decided to use it to make a bench. You can see the build process here.
I sold this one.
10/20/2022 My wife, Judy, is a professional musician (cello). All musicians who play stringed instruments get calluses on the end of their left hand fingers (the right hand holds the bow). They need those calluses in order to be able to play their instrument for a couple of hours in a performance, as well as for the hours of rehearsal prior to the performance, and for their everyday practice. They have to practice every day in order to maintain those calluses, as well as to learn the music for the next performance.
However, Judy and I occasionally take a trip of up to three weeks where she does not have access to an instrument and her calluses fade away. Rebuilding those calluses takes time after we return so she cannot do a performance for several weeks after we return.
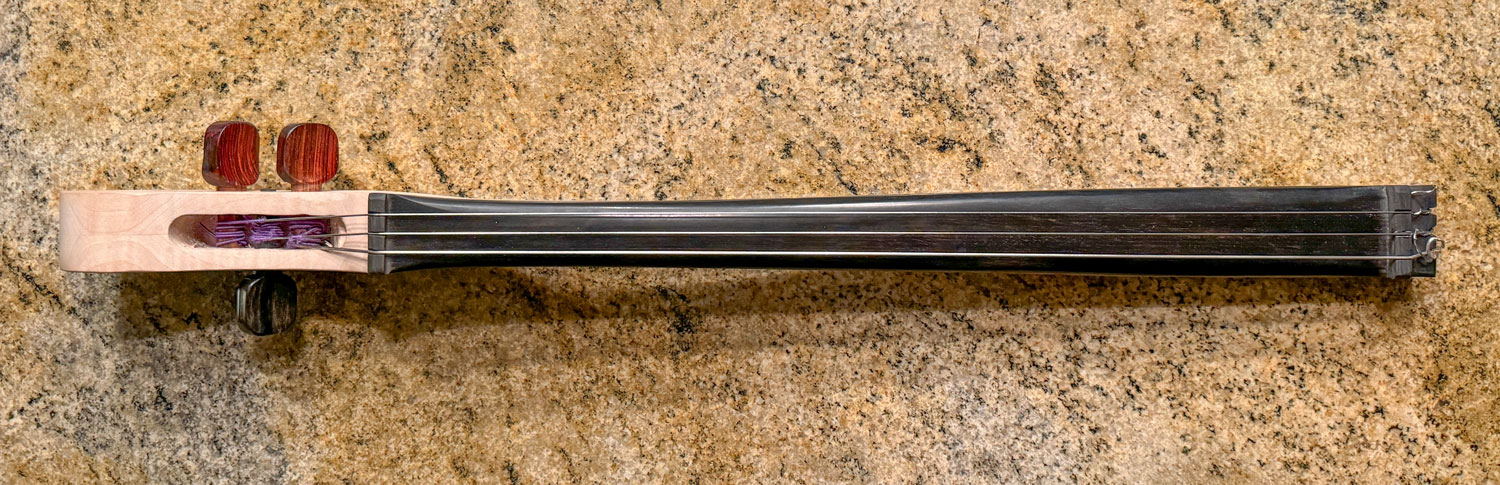
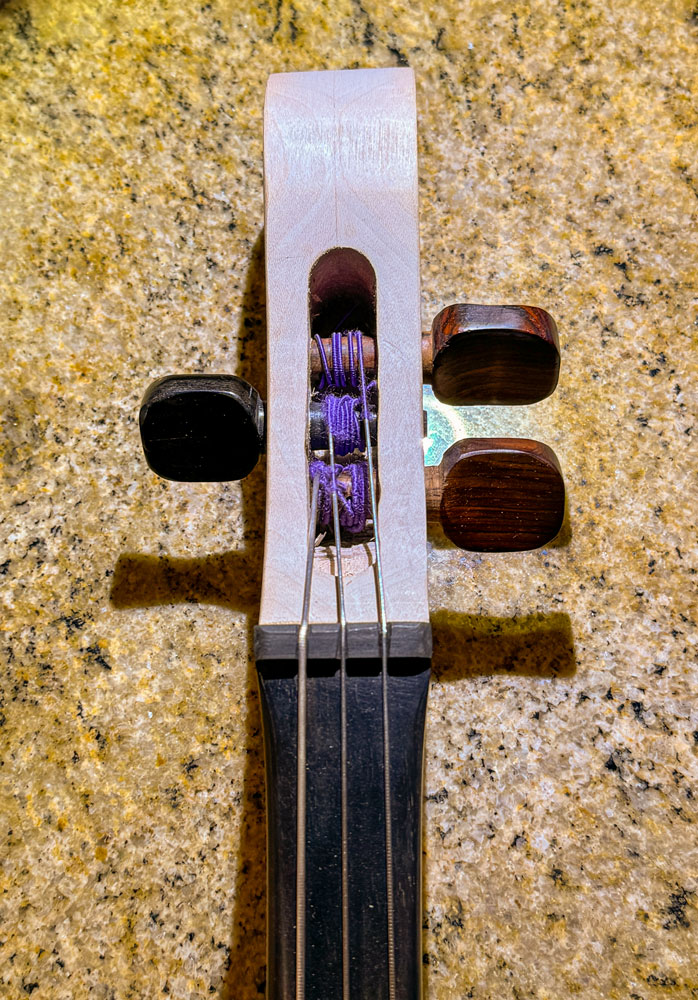
To help her maintain her calluses, I made a practice piece, sort of a scaled down cello neck. While a cello has four strings, the practice piece has only two, but that's sufficient. She can run the fingers of her left hand over the strings, pressing them down, as she would when playing - and therefore maintain her calluses.
Here's a picture of what I made for her. It's not as "fine" as her cello, but it will work. I thought of carving a scroll on the end of the piece, and may do it one day. I should also polish the ebony a bit more, to a mirror shine. First, a view from the side, showing the pegs. The pegs are made from cocobolo and the peg heads are on the side away from her head when she uses it (the head of the cello goes on the musician's left shoulder). The strings are ones that she replaced on her cello.

And a view from the top - you can see into the pegbox. The finger board of most stringed instruments is ebony and I used ebony on top of maple for this piece. I used too much taper on the pegs, but they work with some effort - after I tighten one, while I'm still holding the tension, I tap the peg into the pegbox. If I don't do that, the peg can unwind.
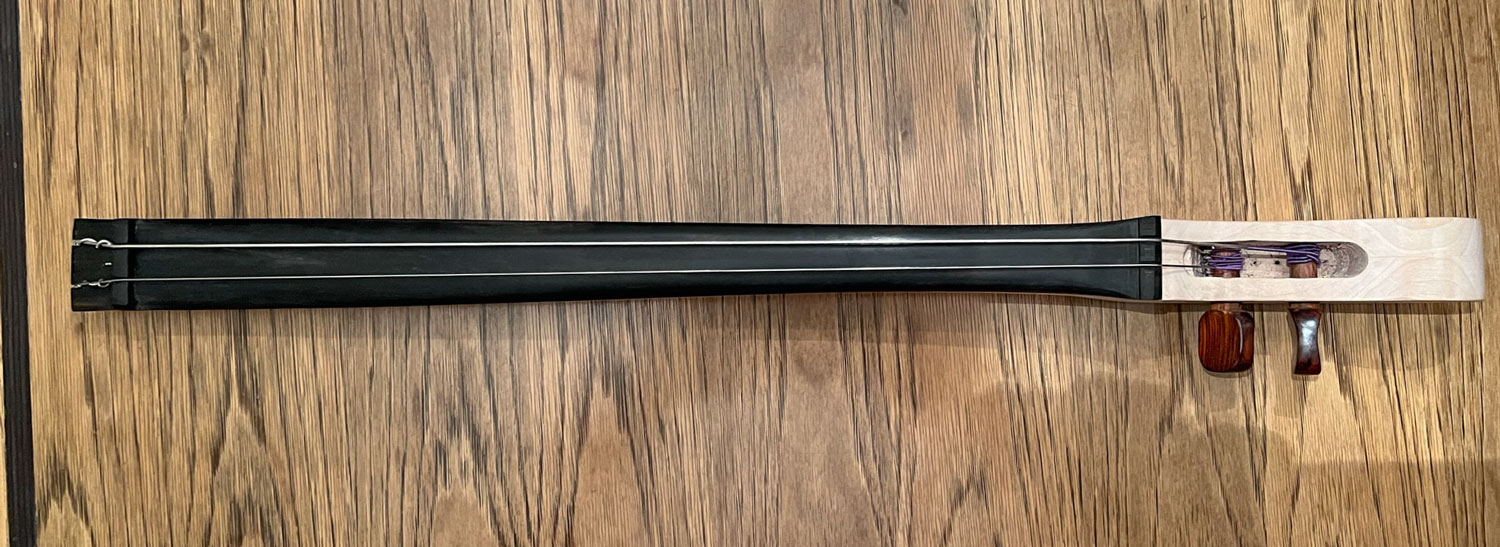
Judy will try it out on our next trip. I hope it works well for her.
[Update: While this worked, Judy asked me to add another string, which I did. I could have added a fourth string by enlarging the peg box but Judy said she didn't need it.]
++++++++++++++++++++++++++++++++++++++++++
My projects continue here.