
Expanding Kitchen Table
P. Michael Henderson
I've been asked occasionally to build this table for others, but most of the time the person making the request has been some distance from me and the shipping would be prohibitive. I've drawn some rough plans for the table which you can access here. While the plans are not nice, detailed plans, an experienced furniture maker should be able to figure things out from them.
I made this table early in my woodworking career and there are a number of things I'd change if I were doing it today. But basically, it's a good design and has worked very well for us.
My wife, Norma, wanted to replace the table in our kitchen but she wanted something with a bit more style than the Ikea table we had, and she wanted a table that could be expanded to accommodate a larger group when we had guests.
I never liked expansion tables with leaves because of the need to store the leaves. Invariably, the leaves get scratched in storage and they wind up a different color because of the different exposure to light, since the leaves are usually in the closet.
When I began the design of the table, I had several goals.
1. The table should be “completely contained.” That is, the parts required for expanding the table should be included as part of the table. No closet storage necessary.
2. The table should have a significant expansion factor. I wanted a table that could expand to a full 72 inches in length, but could serve as a table for two to four in the kitchen when closed.
3. The base should maintain its proportion to the top when open or when closed. Leaf type tables do this but certain other types of expansion tables do not.
4. The apron should be continuous when open or closed for visual appeal. Some leaf-type expansion tables have the apron parts attached to the leaves so that there will not be any apron gaps when the leaves are installed, but this requires more space for storage of the leaves.
The requirement for being completely contained eliminated leaf type expansion tables. I reviewed the literature on expansion tables before designing my own but didn’t find exactly what I was looking for.
One type of completely contained table is the “butterfly leaf” expansion table where the leaf folds in two and tucks under the table top (see FWW #94, pages 50-54). However, this type of table works like a pedestal table, so its base does not maintain its proportion between open and closed. That is, the base stays the same size no matter whether the table is open or closed. Additionally, the expansion of the table is limited to one leaf.
Antique fold-over top card tables were interesting but the technique for supporting the top did not work well. Two techniques are used, an accordion fold apron and a gate leg. The gate leg tends to wind up in the place where people sit, while the accordion fold apron is just too weak to work as a kitchen table. An accordion table works well for the light loads of a card table but would not be safe for Thanksgiving dinner. See “An Expanding Table” in FWW #165, pages 38-40 and “Convertible Furniture” in FWW #93, pages 68-71 for two fold-top tables.
The design I eventually developed includes the fold over top of an antique card table but uses table extenders (or slides), as are used on leaf-type extension tables. Let me see if I can describe the construction with the help of pictures.

Figure 1 – Table closed. Note the fold over top.
Figure 1 shows the table in its closed form. The top is a fold-over, which makes the top double thickness when closed. Ebony strips have been inlaid in the side to break up the thick appearance. The size of the top is 36 by 42 inches. The top is pecan veneer with a border of 1/2 inch ebony veneer.
I wanted to do an inlay in the center of the table, a geometric design based on a quilt pattern, but Norma talked me out of it. If I had done it, I would have reflected the same design in the open table, with half of the inlay on each section of the top, so the inlay would be centered on the open top. I think she was right, that the table would have been too busy, but I may use the idea in a future less formal (fun) table - maybe a Formica top table with a wood veneer inlay.

Figure 2 – The table open. Note that the apron is continuous and the proportion of the base to the top is maintained – there is the same overhang as with the top closed.
In figure 2, the table is shown open. When open, the top is 42 by 72 inches, double the size when closed. Soss hidden hinges are used to hinge the tops. The apron is continuous when open and the table top has the same overhang as when the table is closed. In effect, the table looks “finished” whether it is open or closed.

Figure 3 – The table with the expansion base pulled out.
So how is this accomplished? Let’s look at figure 3 which shows the table pulled open. You’ll see that the expansion is accommodated with standard table slides. The table slides are attached to the bottom of the top on one side, but there's no top to attach it to on the other side. To solve this problem I put in a "lower top" on the expansion side below the slides and attached the slides to this "lower top." The "lower top" is 3/8 inch plywood which has pecan veneer glued to both sides - it winds up being about 1/2 inch thick. It is also used to support the "pivoting apron" parts, described below. The lower top is let into grooves in the legs and apron. Although a bit hard to see in the picture, there are two pieces of apron on pivots alongside the table slides. These are what I call the “pivoting apron” parts and are explained in more detail in later pictures.
The pivoting apron parts can not be made long enough to complete the apron so two additional apron parts are used, connected to the ends of the aprons. I call these the “swinging aprons,” shown in more detail in Pictures 4 & 5. When the table is extended, the swinging apron parts are moved so that they are in line with the apron. The swinging aprons are held in place by small magnets installed into the apron parts.
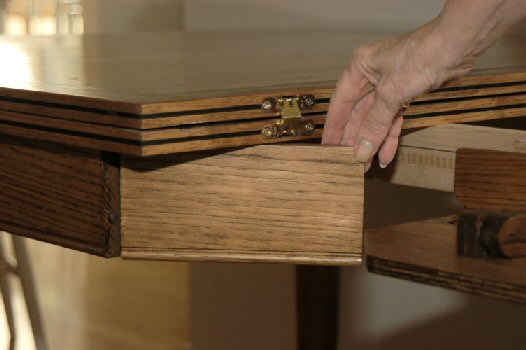
Figure 4 – The swinging apron parts are brought into position. You can just see one of the magnets which holds the apron open.
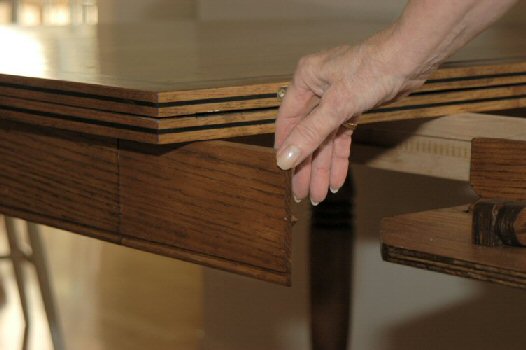
Figure 5 – The swinging apron parts are held in position by small magnets installed in the swinging and permanent aprons.
The pivoting apron parts are then pivoted into position and the table top is folded open. The table extenders allow the table base to open about an inch more than necessary to support the table top, similar to the way a leaf extension table extends enough so that you can place the leaves in position. After the parts are swung into position, the table is bumped closed. For aesthetic appeal, the pivoting apron should be made the same length as the permanent apron. This centers the swinging apron on the table joint.

Figure 6 – The pivoting apron being moved into position.

Figure 7 – The pivoting apron is moved into final position.
The swinging apron fits into the pivoting apron with a modified lap joint. This causes the apron parts to line up horizontally. To achieve vertical alignment, the swinging apron has a triangular shaped projection which fits into a socket on the pivoting apron. These force the apron parts into alignment when the table is bumped together. See next two pictures.
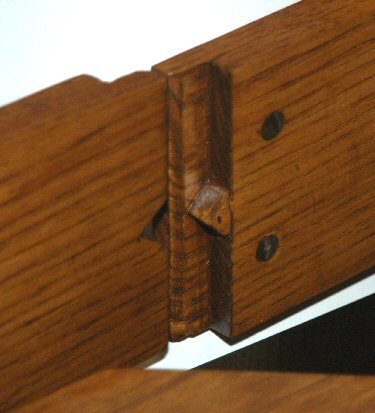
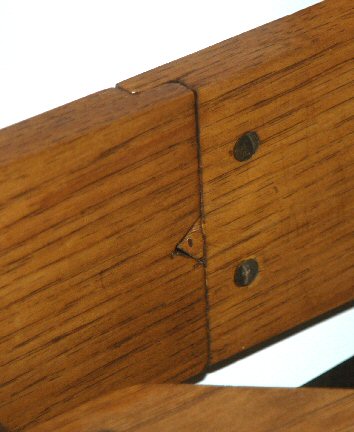
Figures 8 & 9 – The joint used to force the swinging and pivoting aprons to align. View is from the inside of the table.

Figure 10 – After the base is bumped in about an inch (to close up the apron), the top is folded over to open the table.
Figure 11 – The table has now been expanded. I veneered the top so the grain always runs the length of the table. Compare the grain in this picture with that in Figure 1 or Figure 10.

Figure 12 – Another view of the open table to show the continuous apron.
A few technical details: The wood is pecan. I turned the legs from a picture of a table that Norma found and liked. I had her come into the shop as I turned the first leg to make sure the legs were what she wanted and then copied the first leg. I stained the wood with Minwax "Provincial" stain first, then came back with Bartley gel stain "Honey" to warm it up. The finish is lacquer - brushed satin lacquer on the base and spray satin lacquer on the top surfaces. I used solvent based lacquer because I've never sprayed water based lacquer and didn't want to learn on this table. The spray lacquer came out too shiny so I used 0000 steel wool to bring it down. Norma then thought it was too satin so I had to use polish to bring some of the shine back. Oh, well... whatever the client wants!
While this design has a number of advantages, it also has a few disadvantages. Since the table is “complete,” in the closed position it is heavier than a normal table of the same size. Additionally, the top is about 3/4 of an inch higher in the closed position than in the open position. One way to address this issue is to make the top about 1/4 inch higher than “normal” in the closed position, which makes the table 1/2 inch lower than “normal” in the open position. Most people cannot notice these differences.
I also made a set of four chairs to go with the table. I entered one of the chairs into a local woodworking competition and won "Industry Best of Show" with it. You can see the chair towards the bottom of this page.
If you're interested in some of my other work, you can find it here.